Uncategorized
HighLevel vs Salesforce for Coders: All-in-One Growth Hack or Enterprise Powerhouse?
When you’re building software, freelancing, or scaling a SaaS, choosing the right CRM is a decision that ripples through your entire business. Two names often mentioned are HighLevel (GoHighLevel) and Salesforce.
On the surface, they’re both CRMs. But in reality, they couldn’t be more different: one is an all-in-one growth toolkit designed to replace half a dozen apps, while the other is an enterprise-grade platform powering Fortune 500 sales teams.
So which makes sense for coders, vibe coders, and entrepreneurs in 2025? Let’s break it down.
Quick Comparison Snapshot
| Feature | HighLevel | Salesforce |
|---|---|---|
| Core Focus | Funnels, automation, client comms, all-in-one | Enterprise CRM, sales automation, deep customization |
| Pricing | $97–$497/mo flat | From ~$25/user/mo to $300+/user/mo |
| AI Tools | AI receptionist, chatbot, funnel builder | Einstein AI (forecasts, lead scoring, automation) |
| Integrations | Limited unless on higher plans | Massive AppExchange marketplace + API |
| Scalability | SMBs, agencies, SaaS resellers | Enterprise-scale, highly customizable |
| Best Fit | Agencies, freelancers, small SaaS founders | Enterprises, scaling SaaS, dev-heavy orgs |
Our Favorite CRM: Try GoHighLevel Risk Free
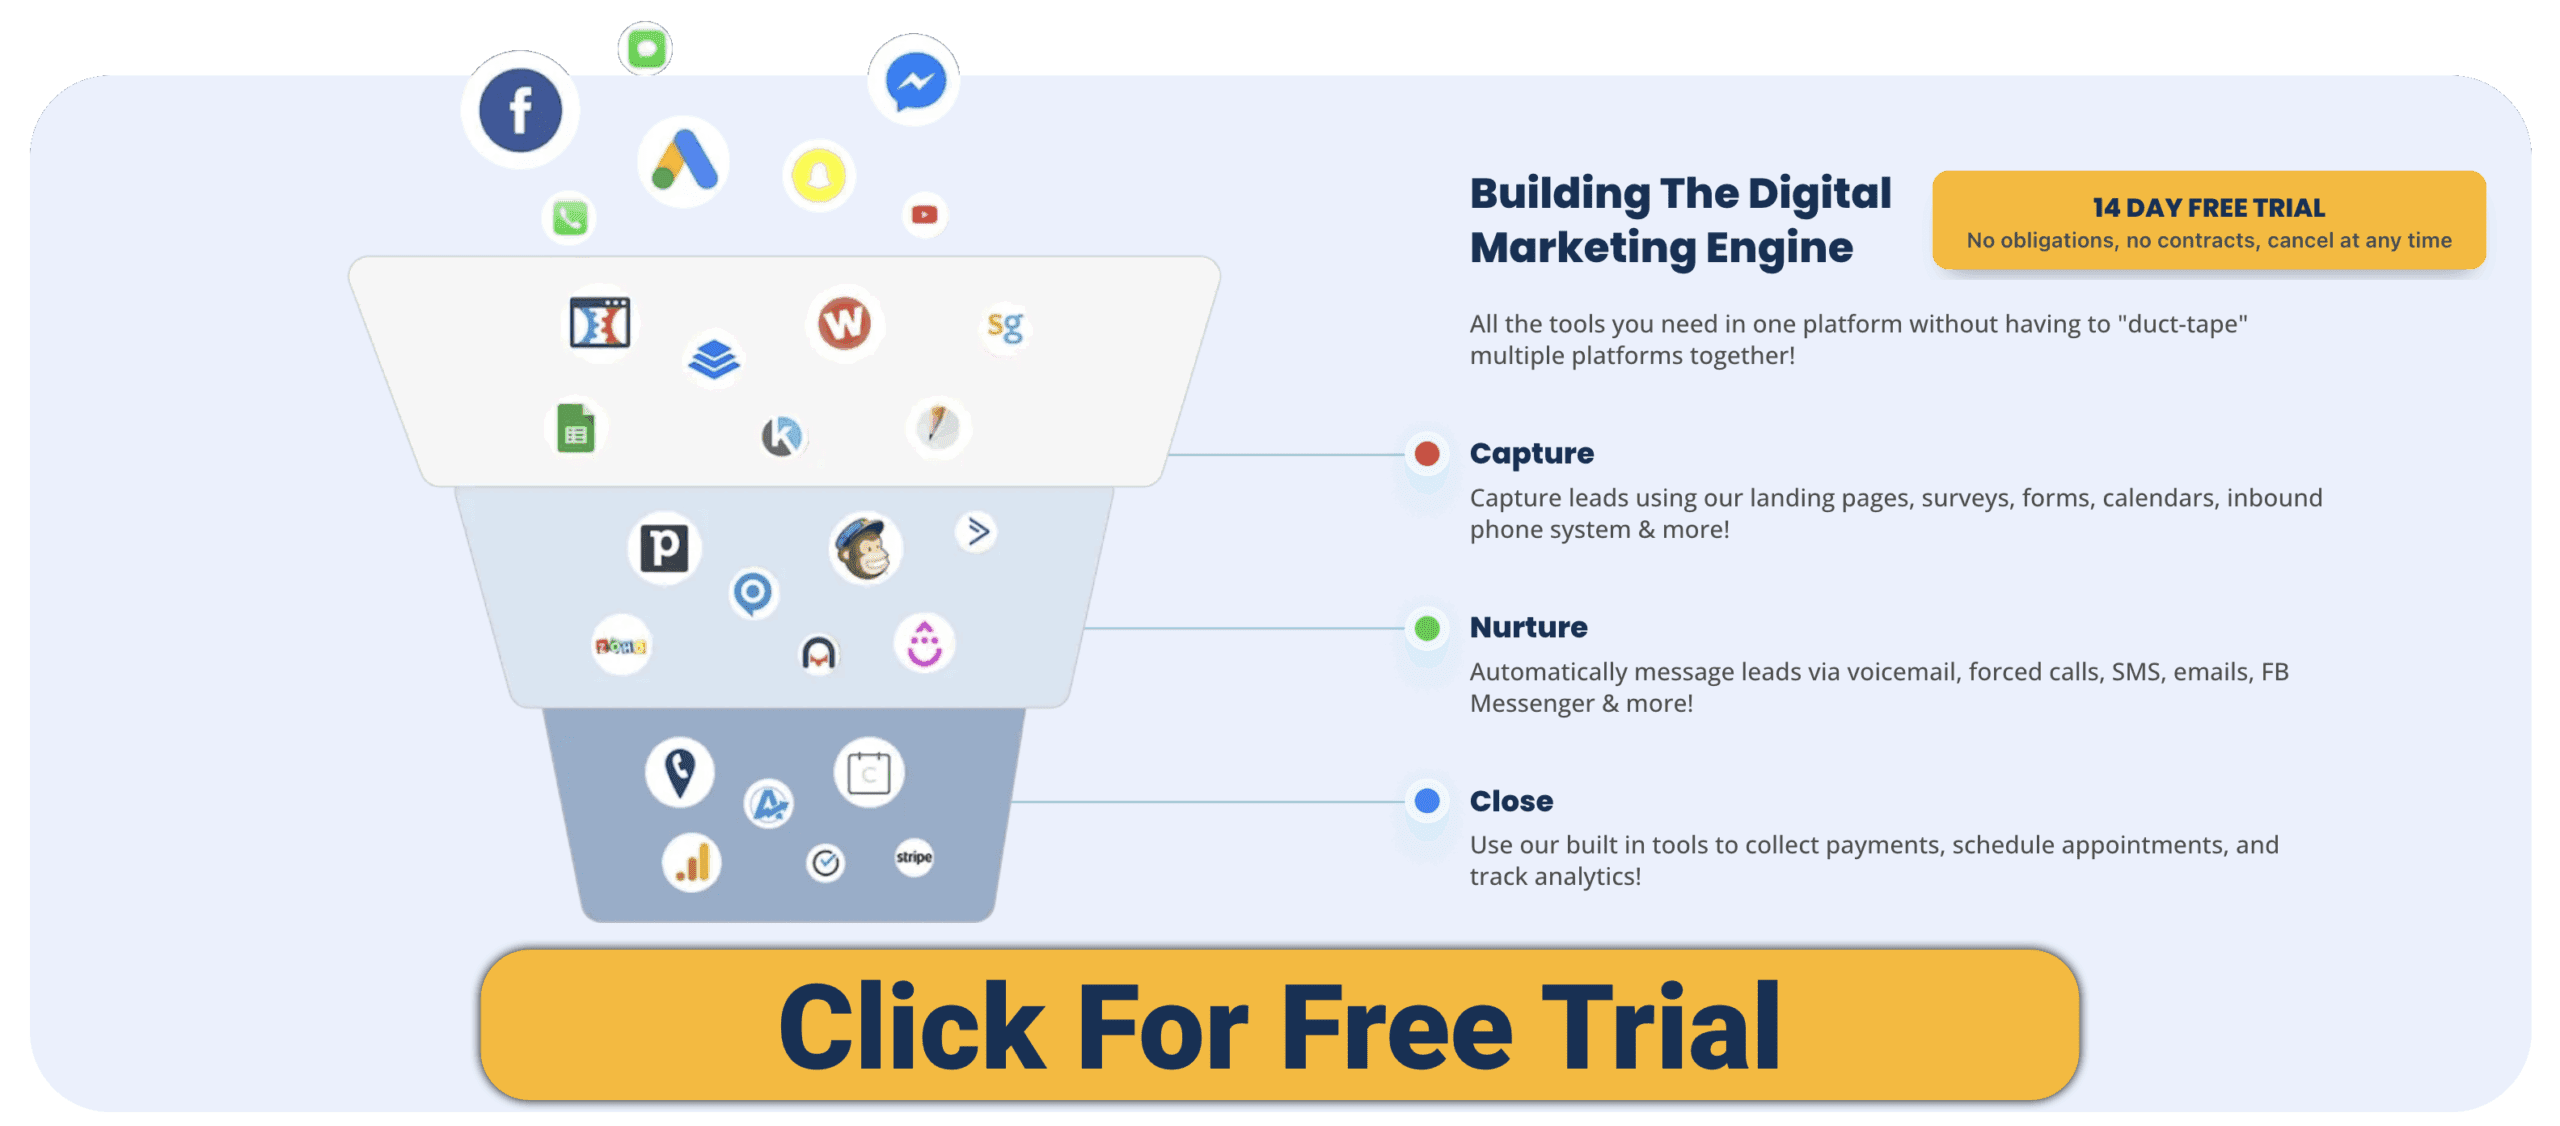
HighLevel: The All-in-One Growth Hack
HighLevel shines as an all-in-one business launcher for coders who don’t want to duct-tape 6 different tools together.
-
Funnels & Websites – Spin up landing pages and sales funnels quickly.
-
Multi-Channel Inbox – Manage email, SMS, Messenger, Instagram, and chat.
-
Automations – Drag-and-drop workflows for follow-ups and nurturing.
-
AI Agents – Receptionist bots, AI chat, and AI funnel builder.
-
White-Label SaaS – Resell HighLevel under your own brand.
-
Memberships – Course hosting and client portals.
For vibe coders or indie SaaS founders, HighLevel means less time building infrastructure and more time coding the actual product.
Salesforce: The Enterprise Powerhouse
Salesforce has been the gold standard of CRM for decades. It’s not just a CRM—it’s an ecosystem.
-
CRM Core – Manage leads, opportunities, accounts, and reporting.
-
Einstein AI – Predictive insights, lead scoring, opportunity forecasting.
-
AppExchange – 5,000+ third-party integrations.
-
Customization – Apex coding, custom objects, tailored dashboards.
-
Industry Clouds – Solutions for finance, healthcare, SaaS, and more.
-
Scalability – Handles from 5 users to 50,000.
For developers, Salesforce is like a platform-as-a-service CRM. You can customize everything, but it comes with complexity.
Pros & Cons
HighLevel Pros
-
Flat-rate pricing (unlimited users).
-
Combines marketing + sales + comms in one place.
-
White-label SaaS option = revenue stream for coders.
-
Fast funnel and automation setup.
-
AI tools focused on client-facing efficiency.
HighLevel Cons
-
Lacks the deep customization of Salesforce.
-
Limited API/integrations on lower tiers.
-
Geared toward SMBs and agencies, not enterprise.
Salesforce Pros
-
Most powerful and customizable CRM on the planet.
-
Robust reporting and analytics.
-
AppExchange ecosystem = endless integrations.
-
Einstein AI is sophisticated and enterprise-ready.
-
Scales infinitely with your company.
Salesforce Cons
-
Expensive (per-user pricing grows fast).
-
Steep learning curve for admins and devs.
-
Overkill for small businesses and freelancers.
-
Onboarding and customization often require consultants.
Use Cases for Vibe Coders
-
Freelancers & Small Agencies → HighLevel is far more practical: funnels, SMS, client comms, all-in-one.
-
Indie SaaS Founders → HighLevel for quick GTM (go-to-market funnels, onboarding), Salesforce if you’re VC-backed and scaling rapidly.
-
Enterprises or Growth-Stage SaaS → Salesforce dominates with scalability, integrations, and compliance.
-
Coders Who Love to Customize → Salesforce offers deep dev flexibility (Apex, APIs), while HighLevel offers ready-made automation without code.
Our Favorite CRM: Try GoHighLevel Risk Free
What Users Say
-
HighLevel: Praised for consolidating marketing tools, but sometimes overwhelming for new users. Agencies love the white-label SaaS model.
-
Salesforce: Known as the “industry standard” but also criticized for being complex, expensive, and requiring specialist admins.
FAQs
Which is more coder-friendly?
Salesforce is more customizable with APIs and its Apex language, but HighLevel is easier to launch and resell.
Which has better AI?
Salesforce Einstein is enterprise-grade (forecasts, lead scoring). HighLevel’s AI is practical for SMBs (chatbots, receptionist bots).
Can HighLevel scale to enterprise?
Not really—it’s best for SMBs, agencies, and coders launching SaaS.
Can Salesforce replace HighLevel’s funnels?
Not out of the box. You’d need to integrate with external tools like Pardot or third-party funnel builders.
Final Verdict
-
Choose HighLevel if you’re a freelancer, small agency, or coder launching a SaaS and need an all-in-one funnel + CRM solution without enterprise complexity.
-
Choose Salesforce if you’re running or joining a scaling enterprise SaaS that requires deep customization, advanced reporting, and robust AI insights.
Bottom line: HighLevel = growth hack for SMBs and agencies, Salesforce = enterprise powerhouse. Coders should pick based on whether they want to move fast and launch or customize and scale big.
Want to see more comparisons? Check out our other posts on CRMs!
HighLevel vs Pipedrive for Vibe Coders: Funnel Builder or Pipeline King?
Choosing the right CRM isn’t just about managing contacts. For coders, SaaS founders, and vibe coders experimenting with automation, funnels, or freelance projects, your CRM can be the difference between scaling smoothly and drowning in spreadsheets.
Two of the most talked-about platforms in 2025 are HighLevel (GoHighLevel) and Pipedrive. Both claim to help you win more clients and keep business flowing, but they take radically different approaches. One is built to be an all-in-one funnel and automation machine, while the other focuses on being the cleanest, simplest pipeline tracker in the game.
So, which is right for you? Let’s break it down.
Quick Comparison Snapshot
| Feature | HighLevel | Pipedrive |
|---|---|---|
| Core Focus | Funnels, websites, automation, multi-channel follow-up | Sales pipelines, simple deal management |
| Pricing | From $97/mo (flat, unlimited users/contacts) | From ~$14.90/user/mo |
| AI Tools | AI receptionist, AI chatbot, AI funnel builder | AI Sales Assistant for prioritization & deal tips |
| Integrations | Limited on lower plans; API access at $497/mo+ | Strong API + marketplace with 400+ integrations |
| Best Fit | Agencies, freelancers, SaaS resellers | Freelancers, SaaS founders, lean sales teams |
Our Favorite CRM: Try GoHighLevel Risk Free
HighLevel: The Funnel Builder for Coders
HighLevel positions itself as an all-in-one growth platform. Instead of buying separate tools for email marketing, funnels, appointment booking, SMS reminders, or membership sites, you get it all under one roof.
-
Funnel & Website Builder – Drag-and-drop builder for landing pages, full websites, and lead funnels.
-
Unified Inbox – Manage SMS, email, Facebook Messenger, Instagram DMs, and web chat in one dashboard.
-
Automations – Sophisticated workflows for follow-ups and client nurturing.
-
AI Agents – An AI receptionist to answer calls, AI chatbots for client questions, and even AI-assisted funnel generation.
-
White-Label SaaS Mode – Unique to HighLevel, coders and agencies can rebrand and resell the platform as their own CRM.
For vibe coders, HighLevel shines if you’re building client-facing systems—whether that’s running an agency, testing MVP funnels, or productizing your services.
Pipedrive: The Pipeline King for Developers
Pipedrive keeps things lean and laser-focused on sales pipeline management. Its kanban-style interface makes it easy to see where every deal is in your process.
-
Pipeline View – Visual kanban boards to track deals from lead to close.
-
AI Sales Assistant – Recommends which deals to prioritize and provides insights.
-
Calendar & Email Sync – Integrated scheduler and email tracking.
-
Marketplace & API – Over 400 third-party integrations and a robust open API for coders who want to extend functionality.
-
Mobile App – Lightweight and intuitive, designed for teams on the go.
For coders, Pipedrive’s openness is a huge win. You can easily connect it to your dev tools, build custom automations with APIs, and keep your CRM clean without being buried under “all-in-one” bloat.
Pros & Cons
HighLevel Pros
-
Replaces multiple tools (funnels, SMS, email, booking, courses).
-
Unlimited contacts and funnels.
-
White-label mode = create your own SaaS product.
-
Practical AI agents for calls and chat.
-
Flat pricing (not per user).
HighLevel Cons
-
Steeper learning curve for beginners.
-
Limited integrations unless you’re on higher tiers.
-
Features may lack polish compared to specialist tools.
Pipedrive Pros
-
Intuitive, easy to learn, and fast to set up.
-
Affordable entry-level plans.
-
API and marketplace are coder-friendly.
-
AI Sales Assistant is helpful for freelancers prioritizing work.
-
Lightweight and non-overwhelming.
Pipedrive Cons
-
No free tier (just a 14-day trial).
-
Limited marketing automation compared to HighLevel.
-
Email sync/automation often locked to higher plans.
-
Not built for funnels or content hosting.
Use Cases for Vibe Coders
-
Solo Freelancers – Pipedrive helps track proposals, freelance gigs, and client leads without extra clutter.
-
SaaS Founders – HighLevel is great for spinning up landing pages and funnels quickly; Pipedrive is better if you already have dev workflows and just need sales tracking.
-
Agencies or Consultants – HighLevel’s white-label SaaS mode creates recurring revenue opportunities.
-
Coders Who Automate – Pipedrive’s open API is perfect for custom workflows. HighLevel appeals if you want pre-built automations without writing code.
What Coders Say
-
HighLevel: Agencies love it for consolidating multiple tools; developers note the power but mention a steeper learning curve and fewer integrations.
-
Pipedrive: Praised for being clean, API-friendly, and great for sales tracking. Criticized for lacking built-in marketing automation.
Our Favorite CRM: Try GoHighLevel Risk Free
FAQs
Which CRM is more coder-friendly?
Pipedrive, thanks to its open API and integrations.
Which has stronger AI?
HighLevel uses AI for customer-facing tools (chatbots, receptionists), while Pipedrive uses AI for internal deal insights.
Can I resell HighLevel as my own SaaS?
Yes, with its white-label option—popular among coder-founders who want to launch SaaS without building from scratch.
Is Pipedrive enough for marketing automation?
Not really. Pair it with tools like Zapier, ActiveCampaign, or custom scripts for deeper automation.
Final Verdict
-
Choose HighLevel if you want an all-in-one funnel builder and automation platform, or if you’re a coder who sees value in reselling it as your own SaaS.
-
Choose Pipedrive if you’re a developer, freelancer, or SaaS founder who wants a simple, API-friendly pipeline manager that integrates into your existing stack.
Bottom line: HighLevel is the Funnel Builder; Pipedrive is the Pipeline King. Your choice comes down to whether you want breadth of features under one roof, or lean sales tracking you can extend with your own coding chops.
Want to see more comparisons? Check out our other posts on CRMs!
HighLevel vs HubSpot: Which CRM is Best for Your Business
Our Favorite CRM: Try GoHighLevel Risk Free
Choosing the right CRM can feel overwhelming. Two of the most popular options today are HighLevel (GoHighLevel) and HubSpot. Both promise to centralize your customer data, automate sales and marketing, and help you scale. But they take very different approaches — and the better choice depends on your goals, technical skills, and budget.
This guide breaks down their features, pros, cons, and ideal use cases to help you decide.
Quick Overview
| Feature | HighLevel | HubSpot |
|---|---|---|
| Target Audience | Agencies, marketers, SMBs | SMBs to enterprises |
| Pricing | From $97/mo (all-in-one) | Free CRM, paid tiers up to $890+/mo |
| Key Strength | All-in-one sales & marketing automation (funnels, SMS, calls, websites) | Polished inbound marketing & sales with deep integrations |
| AI Tools | AI receptionist, chatbot, funnel builder | AI email writer, sales predictions |
| White Label | Yes (SaaS reselling option) | No |
| Free Plan | 14-day trial only | Robust free CRM (1M contacts) |
Features Breakdown
HighLevel
-
All-in-one toolkit: Funnels, websites, forms, surveys, calendars, SMS, voicemail drops, email marketing.
-
Unified inbox: Centralizes email, SMS, FB Messenger, Instagram DMs, and web chat.
-
Automations: Sophisticated workflows for follow-ups across channels.
-
AI Agents: Voice receptionist to book appointments, chatbot for FAQs, AI website/funnel builder.
-
White-label SaaS mode: Agencies can resell the platform under their brand.
-
Memberships: Host courses or gated content.
HubSpot
-
Free CRM: Contact management, deal pipelines, task management.
-
Marketing Hub: Email marketing, landing pages, forms, ad management.
-
Sales Hub: Meeting scheduler, email tracking, built-in dialer.
-
Service Hub: Ticketing, knowledge base, live chat & chatbot.
-
CMS Hub: Blogging and SEO tools, integrated website builder.
-
App Marketplace: Hundreds of integrations with 3rd-party tools.
-
AI Assistant: Email drafts, chatbots, reporting insights.
Our Favorite CRM: Try GoHighLevel Risk Free
Pros & Cons
HighLevel Pros
-
All-in-one: replaces 5–7 separate tools.
-
Unlimited funnels, websites, contacts.
-
White-label option for agencies.
-
Affordable flat pricing vs per-contact models.
-
AI agents for calls, chat, and funnel building.
HighLevel Cons
-
Steeper learning curve for beginners.
-
Fewer native integrations (API access locked to higher plans).
-
Generalist approach: features may lack polish compared to dedicated tools.
HubSpot Pros
-
Generous free CRM (1M contacts).
-
Clean, intuitive UI with great onboarding.
-
Seamless integration across marketing, sales, and support.
-
Huge marketplace and community.
-
Excellent documentation and HubSpot Academy.
HubSpot Cons
-
Pricing skyrockets at Professional/Enterprise levels.
-
Onboarding fees ($3k for Marketing Pro).
-
Advanced automation only at higher tiers.
-
Design templates can feel limited.
Who Should Choose HighLevel?
-
Agencies & consultants: Manage multiple clients, resell white-labeled CRM.
-
Local businesses: Need SMS/email reminders, review requests, and quick follow-ups.
-
Freelancers/solopreneurs: Want funnels, websites, and CRM all in one without paying for multiple tools.
Who Should Choose HubSpot?
-
Startups: Begin free, scale as you grow into more advanced hubs.
-
SaaS companies: Need inbound marketing, content, and support tools tied together.
-
SMBs with sales teams: Benefit from HubSpot’s polished pipeline management and reporting.
Frequently Asked Questions
Is HighLevel a replacement for HubSpot?
Not exactly. HighLevel focuses on replacing many tools at once (funnels, email, SMS, booking, websites). HubSpot focuses on best-in-class inbound marketing and sales alignment.
Which is more affordable?
HighLevel has flat pricing ($97–$497/mo). HubSpot starts free but quickly escalates into hundreds or thousands per month as your contact list and features grow.
Which has better AI?
HighLevel leans into practical AI agents (chatbots, receptionists). HubSpot uses AI for content (email drafts, insights) and reporting.
Which is easier to use?
HubSpot wins for polish and beginner-friendly UI. HighLevel has more features upfront, which can overwhelm new users.
Can I migrate from one to the other?
Yes, but it depends on what you use most. HubSpot has migration services (paid). HighLevel offers tutorials and community support for importing contacts and funnels.
Final Verdict
-
Choose HighLevel if you want an all-in-one growth machine with funnels, SMS, and white-label options — especially as an agency or freelancer who needs to manage clients.
-
Choose HubSpot if you want a polished, scalable CRM with strong inbound marketing, deep integrations, and a long-term ecosystem to grow with.
Both platforms can help you scale, but the right one depends on whether you value breadth of features (HighLevel) or depth of polish and integrations (HubSpot).
Want to see more comparisons? Check out our other posts on CRMs!
Netlify vs. Bolt Cloud: Which Hosting Platform Is Right for You?
Bolt Cloud recently launched its own built-in hosting, breaking away from its earlier dependence on Netlify. Both platforms now sit at the forefront of modern web deployment, but they approach the problem from very different angles. Whether you’re a team managing enterprise workflows or a vibe coder building in flow, knowing the strengths and trade-offs of each platform will help you choose wisely.
This comparison draws on real-world usage, public documentation, and community feedback.

What Is Netlify?
Netlify is a veteran in the JAMstack ecosystem. It made a name by offering:
- Git-based CI/CD for seamless deploys.
- Deploy previews and rollbacks, streamlining collaboration.
- Edge Functions and CDN for fast global delivery.
Netlify is trusted for stable, large-scale front-end hosting and is a go-to choice for many professional teams.
What Is Bolt Cloud?
Bolt Cloud evolved from Bolt.new, the AI-powered code generation platform. In August 2025, it unveiled its own all-in-one cloud environment. Key built-in features include:
- Hosting & Deployment: Instant
.bolt.hostdomains, custom domains for paid users. - Databases: Managed, high-performance with direct app integration.
- Authentication: Login/signup, roles, and permissions.
- Payments: Native Stripe integration.
- Analytics & Serverless: Usage insights and functions without extra setup.
- File Storage: Integrated storage for uploads and assets.
Bolt Cloud is designed for speed, creativity, and flow—particularly appealing to vibe coders and indie hackers who want to ship without DevOps overhead.
Head-to-Head Comparison
| Feature | Netlify | Bolt Cloud |
|---|---|---|
| Hosting & Deployment | Git-based CI/CD, previews, rollbacks, mature pipeline | Instant deploy to .bolt.host, simple publish workflows |
| Backend Features | None built-in (requires Supabase, Auth0, Stripe, etc.) | Built-in DB, auth, payments, analytics, serverless |
| Workflow | Ideal for teams & Git-driven collaboration | Browser-first, fast prototyping, solo builders & vibe coders |
| Edge & Serverless | Edge Functions, CDN, strong global network | Built-in serverless, tied to Bolt projects |
| Pricing | Free tier (100GB bandwidth), Pro $19/user/mo, usage-based | Free tier, Pro from $25/mo, token-based AI + infra bundle |
| Maturity | Proven stability, enterprise-ready | Early beta, growing quickly but less battle-tested |
Pricing Breakdown
- Netlify: Free tier includes 100GB bandwidth, 300 build minutes, 125k function calls. Pro plan at $19/user/month scales up with 1TB bandwidth and 25k build minutes. Overages can get pricey for dynamic workloads.
- Bolt Cloud: Free tier with limited hosting and AI tokens. Pro starts at $25/month, including hosting, databases, auth, payments, analytics, and token rollover. Higher tiers scale for heavier usage.
Pros and Cons
Netlify ✅
- Mature, reliable hosting platform.
- Git-driven workflows fit teams well.
- Strong edge/CDN performance.
Netlify ⚠️
- No native backend tools.
- Costs can rise quickly with scale.
Bolt Cloud ✅
- All-in-one platform: backend + hosting + monetization.
- Removes setup friction, great for vibe coders.
- Fast prototyping and MVP launches.
Bolt Cloud ⚠️
- Still in beta, occasional rough edges.
- Token model can be confusing.
- Not yet as proven for enterprise-scale production.
Best Use Cases
- Netlify: Established teams, JAMstack projects, enterprise-scale front-ends, Git-centric workflows.
- Bolt Cloud: Indie hackers, vibe coders, rapid prototyping, and projects where monetization and backend features are needed out-of-the-box.
Community Sentiment
Netlify remains trusted and stable, with widespread adoption among professional developers. Bolt Cloud, while new, has generated significant buzz among indie hackers and vibe coders because it eliminates DevOps overhead. Early adopters highlight how quickly they can move from idea → live product → monetized experiment.
Conclusion: Choosing the Right Platform
Both platforms shine in different contexts:
- If you want stability, scale, and team workflows → Netlify is the safer choice.
- If you want speed, flow, and integrated full-stack features → Bolt Cloud is a game-changer.
The best approach? Test both. Run a project through each and see which aligns with your workflow and goals.

The Best AI Coding Tools (Ranked & Reviewed) — Which One Should You Use?
Artificial intelligence is reshaping how developers build software. The rise of AI coding assistants — sometimes described under the umbrella of “vibe coding” — marks a shift from line‑by‑line coding to guiding AI models through prompts and conversations. The result: faster development, fewer repetitive tasks, but also new challenges around accuracy, privacy, and oversight.
This guide explores the most popular AI‑powered coding tools available in 2025, comparing features, pros and cons, and ideal use cases. Whether you’re a solo developer, a startup, or part of an enterprise team, this breakdown will help you choose the right assistant for your workflow.

What is Vibe Coding?
Coined by researcher Andrej Karpathy in 2025, vibe coding describes a workflow where developers focus less on typing and more on directing AI models to generate, refactor, and debug code. It’s collaborative: the AI handles boilerplate and repetitive logic, while the developer acts as reviewer, guide, and architect.
Benefits:
- Faster prototyping and iteration
- Reduced cognitive load on repetitive tasks
- Ability to explore alternative approaches quickly
Risks:
- Potential for hallucinated, insecure, or inefficient code
- Over‑reliance may erode developer fundamentals
- Privacy and IP concerns depending on the tool
AI Coding Tools Comparison Table
| Tool | What It Is | Key Strengths | Limitations / Risks | Best For |
|---|---|---|---|---|
| GitHub Copilot | IDE-integrated AI coding assistant (VS Code, JetBrains) | Boosts speed, broad adoption, strong IDE integration | Can produce insecure/inaccurate code, paid subscription | Developers wanting productivity inside familiar IDEs |
| Cursor | AI-first fork of VS Code with conversational coding | Project-wide AI refactoring, in-context prompts, privacy mode | New tool, smaller ecosystem, prompt quality matters | Devs comfortable with VS Code seeking deeper AI features |
| Tabnine | Privacy-focused AI completion assistant | Secure, customizable models, enterprise compliance | Premium features, setup complexity | Enterprises and privacy-sensitive projects |
| Replit AI | Browser-based IDE with AI assistant | Zero setup, fast prototyping, collaboration friendly | Limited for large/production apps, internet reliance | Beginners, students, rapid prototypes |
| Bolt.new | In-browser full-stack AI app builder | Generates frontend + backend, quick deployment | Limited customization, token costs | Hackathons, MVPs, proof-of-concepts |
| Base44 | No-code AI platform with backend + hosting | Beginner-friendly, built-in DB & auth, visual editing | Vendor lock-in, limited complex logic | Small biz tools, dashboards, non-technical users |
| Claude Code | Anthropic’s agentic tool for IDE/terminal | Repo-wide context, handles multi-file changes, PR automation | Token costs, premium access | Teams needing conversational DevOps + refactoring |
| Manus AI | Autonomous AI agent for async coding tasks | Multi-step workflows, runs in cloud independently | Instability, repetitive loops, experimental | Early adopters testing autonomous AI |
| ChatGPT | General-purpose conversational coding assistant | Explains logic, multi-language, debugging & brainstorming | Occasional hallucinations, no deep IDE integration | Learning, debugging, pair programming support |
Tool-by-Tool Breakdown
GitHub Copilot
Overview: Built on OpenAI’s Codex and GPT models, Copilot integrates directly into editors like VS Code and JetBrains. It provides autocomplete, inline suggestions, and a new “agent mode” that can open issues, suggest fixes, and even submit pull requests.
Strengths:
- Deep IDE integration and wide adoption
- Speeds up routine coding and boilerplate
- Improves developer satisfaction and productivity
Weaknesses:
- Can produce inaccurate or insecure code
- Paid subscription required for full features
- Privacy concerns when handling proprietary code
Best For: Developers who want productivity gains inside familiar IDEs, with human code review in place.
Cursor (AI‑First Code Editor)
Overview: A fork of VS Code designed from the ground up for AI coding. Cursor supports natural language prompts, multi‑file refactoring, and smart error handling.
Strengths:
- Built‑in AI chat with your codebase
- Agent mode for project‑wide tasks
- Supports privacy mode and customizable rules
Weaknesses:
- Relatively new tool, smaller ecosystem
- Prompt quality directly impacts usefulness
Best For: Developers who already use VS Code and want a deeper AI‑first workflow.
Tabnine
Overview: A privacy‑focused AI assistant offering on‑prem, cloud, or encrypted deployments. It adapts to team coding styles for consistent suggestions.
Strengths:
- Enterprise‑friendly: privacy, compliance, and security built‑in
- Customizable models trained on team’s private repos
- Supports automated test generation and documentation
Weaknesses:
- Advanced features locked behind premium tiers
- Setup can be complex for smaller teams or individuals
Best For: Companies in regulated industries or teams with strict IP requirements.
Replit AI
Overview: Browser‑based IDE with AI features like Replit Agent and Ghostwriter. Developers can build and deploy full‑stack apps without setup.
Strengths:
- Zero setup — everything runs in the browser
- Natural language prompts generate deployable apps
- Collaboration and education friendly
Weaknesses:
- Less control for large or production projects
- Dependent on internet and Replit’s hosted environment
Best For: Beginners, students, or developers prototyping small projects quickly.
Bolt.new
Overview: An AI‑powered in‑browser app builder that scaffolds front‑end, back‑end, and databases from a plain prompt.
Strengths:
- Supports frameworks like React, Next.js, and Node.js
- Built‑in integrations (GitHub, Netlify, Supabase, Stripe)
- Fast iteration and deployment
Weaknesses:
- Limited customization for advanced apps
- Token‑based pricing can get costly
Best For: Hackathons, MVPs, and rapid proof‑of‑concepts.
Base44
Overview: A no‑code AI platform that generates fully functional web apps — UI, backend, authentication, hosting — from natural language.
Strengths:
- Beginner‑friendly
- Real‑time collaboration and built‑in database
- Visual drag‑and‑drop editor for customization
Weaknesses:
- Vendor lock‑in risk
- Limited control for complex backend systems
Best For: Small businesses, internal dashboards, and non‑technical founders.
Claude Code (Anthropic)
Overview: Anthropic’s agentic developer tool, available in IDEs and terminals. Claude Code reads issues, writes fixes, tests, and can submit pull requests.
Strengths:
- Long‑context awareness of entire repos
- Handles complex multi‑file changes
- Reduces onboarding time for new developers
Weaknesses:
- Token consumption can be high
- Premium access may be required
Best For: Teams who want conversational DevOps support directly inside their workflow.
Manus AI
Overview: An autonomous AI agent that independently executes multi‑step coding tasks in the cloud.
Strengths:
- Works asynchronously (keeps coding even if you log off)
- Automates debugging, optimization, and repetitive tasks
- Good for background or batch processes
Weaknesses:
- Still experimental, with reports of instability
- Can get stuck in loops or generate irrelevant work
Best For: Early adopters experimenting with autonomous workflows.
ChatGPT (General AI Assistant)
Overview: OpenAI’s conversational AI is widely used as a coding companion — for generating snippets, debugging, or explaining concepts.
Strengths:
- Multi‑language support
- Excellent at logic explanation and problem‑solving
- Accessible and flexible
Weaknesses:
- Not IDE‑native without plugins
- Prone to hallucinations; oversight required
Best For: Learning, debugging, brainstorming solutions, and code reviews.
Comparing the Tools
| Tool | Best Use Case | Key Strength | Main Limitation |
|---|---|---|---|
| GitHub Copilot | Daily coding inside IDEs | Productivity & speed | Accuracy requires review |
| Cursor | Refactoring & AI coding | Deep project context | New, evolving tool |
| Tabnine | Enterprise, regulated | Privacy & compliance | Complex setup, paid tiers |
| Replit AI | Prototyping in browser | Zero setup, deploy quickly | Limited for big projects |
| Bolt.new | MVPs, hackathons | Full‑stack generation | Limited customization |
| Base44 | No‑code app creation | Complete app generation | Vendor lock‑in |
| Claude Code | DevOps + repo workflows | Long context, multi‑file edits | Cost, token usage |
| Manus AI | Background automation | Fully autonomous tasks | Instability, reliability |
| ChatGPT | Debugging & learning | Flexible explanations | Occasional hallucinations |
Best Practices for Safe AI Coding
- Always review AI‑generated code manually
- Use linters, type checking, and automated tests
- Be mindful of privacy and licensing
- Apply version control and CI/CD pipelines
- Treat AI as an assistant, not a replacement
Real-World Developer Tips
- Pair AI with strict code reviews for security
- Start with low‑stakes tasks (tests, boilerplate)
- Use prompt templates to get consistent results
- Experiment with multiple tools — no single assistant fits all workflows
The Future of AI Coding Tools
The coding landscape is moving toward agentic AI — assistants that can plan, execute, and monitor tasks with less human input. “Vibe coding” is becoming mainstream, but success depends on governance, security, and thoughtful adoption.
Conclusion
Choosing the right AI coding tool is about aligning with your project’s scale, goals, and privacy needs:
- For daily IDE integration: GitHub Copilot or Cursor
- For enterprise privacy: Tabnine or Claude Code
- For fast prototyping: Replit AI, Bolt.new, or Base44
- For automation experiments: Manus AI
- For flexible pair programming: ChatGPT
AI won’t replace developers — but it is reshaping how they work. With the right tool, developers can focus on strategy, architecture, and innovation while AI handles the repetitive load.
FAQ
Q: Can I trust AI-generated code in production?
Yes, but only after manual review, testing, and security auditing. Treat AI output like code from a junior teammate.
Q: Do these tools replace human developers?
No. They accelerate workflows but still require oversight and critical thinking.
Q: Which tool is best for beginners?
Replit AI and Base44 offer the lowest barriers to entry.
Q: Which tool is best for enterprises?
Tabnine (privacy) and Claude Code (agentic workflows) stand out.
Bolt Cloud Is Here—and It’s About to Supercharge the Vibe Coding Movement
Why Vibe Coders Should Care
If you’ve ever been in the middle of building something, felt the creative spark flowing, and then hit a wall trying to configure a database or set up user authentication—you know how quickly momentum can vanish. For vibe coders, staying in flow is everything. That’s where Bolt Cloud, the new platform from Bolt.new, comes in. It’s designed to eliminate friction, letting creators move from idea to live, monetized product without leaving the zone.
I’ve been closely tracking Bolt’s evolution from an AI code generator to a full-stack development platform, and this release marks a real turning point.
What Is Bolt Cloud?
Bolt Cloud is a fully integrated environment that combines all the infrastructure vibe coders need in one place:
- Hosting & Deployment: Enterprise-grade hosting via Netlify, instant publishing, and SEO baked in – here’s a full breakdown on Netlify vs Bolt Cloud

- Databases: Managed, high-performance databases directly tied to your projects.

- Authentication: Out-of-the-box signup/login, roles, and permissions.

- Payments: Stripe integration ready to go for subscriptions or one-time charges.

- Analytics: Real-time insights to guide iteration.

- Serverless Functions & File Storage: Scale features without touching external services.

Instead of juggling a patchwork of tools, you get everything under one roof.
Why This Matters for Vibe Coders
1. No More Context Switching
Spinning up external accounts for databases, auth, or payments breaks momentum. Bolt Cloud builds those pieces in, so you keep coding.
2. Instant Deployments
When inspiration strikes, your app can be live in seconds—no pipelines, no DNS headaches.
3. Database Without the Admin Hat
Create and connect tables directly inside Bolt. Perfect for prototypes or MVPs where speed matters.
4. Auth Made Simple
Instead of wrestling with OAuth or JWTs, you drop in a ready-to-use login system.
5. Built-in Monetization
Want to add a paywall, donations, or subscriptions? It’s already wired up with Stripe.
6. Feedback Loops
Analytics and serverless functions mean you can tweak and improve without slowing down.
For vibe coders, it’s like playing music without having to tune the instruments first.

Pricing Breakdown
Bolt Cloud pricing is simple compared to juggling multiple services:
- Free Tier: Generous token limits for experiments.
- Pro (starting at $25/month): Full-stack features plus higher token usage.
- Scaled Tiers: $50, $100, and $200/month plans offering more tokens and heavier usage capacity.
- Token Rollover: Unused tokens carry over—reducing wasted spend.
When compared to Vercel + Supabase + Auth0 + Stripe (easily $100+ a month), Bolt Cloud offers strong value.
Pros and Cons
✅ Pros
- Keeps builders in flow—no setup distractions.
- AI-assisted coding with modern frameworks (Next.js, Astro, Remix, Vue, Svelte).
- Perfect for vibe coders, indie hackers, and rapid prototyping.
- Built-in monetization pathways.
⚠️ Cons
- Token consumption can spike on buggy projects or long sessions.
- Still in beta—expect some rough edges.
- May not be the best fit for enterprise-scale production yet.
- Steeper curve if you’re not comfortable reviewing AI-generated code.
The Bigger Picture: Vibe Coding as a Movement
Vibe coding is about flow, intuition, and removing blockers between ideas and execution. Bolt Cloud is more than just another tool—it’s a sign that the industry is shifting toward environments where infrastructure is invisible and creativity is front and center.
Instead of spending hours configuring DevOps, vibe coders can now ship apps that are live, secure, and monetized in under an hour. That’s a powerful shift.
Final Thoughts & Next Steps
Bolt Cloud is still early, but the direction is clear: the days of context-killing setup work are numbered. If you’re a vibe coder, indie hacker, or developer who thrives on momentum, this is worth exploring.
👉 Try the Bolt Cloud beta and see how it changes your workflow. The question isn’t whether it will save you time—it’s what you’ll build once the friction is gone.
Netlify vs Heroku
In today’s web development landscape, there’s a wide variety of web applications—from simple static sites to complex, dynamic applications with backend processing and database needs. Heroku and Netlify are two popular platforms that cater to different development needs. Heroku is a Platform as a Service (PaaS) focused on providing a managed environment for deploying full-stack applications, while Netlify specializes in Jamstack architecture, targeting static sites with serverless functions. Netlify has also been an integral part of Bolt.new, the vibe coding platform, which has exploded in popularity which is using it for their new Bolt Cloud platform.
Netlify vs Heroku
| Category | Heroku | Netlify |
|---|---|---|
| Focus | Full-stack applications with backend support, Platform as a Service (PaaS) | Static sites and Jamstack applications, optimized for frontend |
| Serverless Functions | Supports complex server-side processing with more robust serverless capabilities | Limited serverless functions suitable for simpler backend needs |
| Integrations | Extensive add-on marketplace for databases, caching, monitoring, and more | Built-in features like form handling and identity management |
| Language Support | Broad language support, including Ruby, Python, Java, Node.js, and more | Supports JavaScript, TypeScript, and Go for serverless functions |
| Deployment | Git-based deployment with automatic scaling | Continuous deployment from Git repositories, global CDN for fast delivery |
| Automatic Scaling | Scales dynamically based on traffic needs (with dynos) | Global CDN scales static content but limited backend scalability |
| Pricing | No free tier (as of November 2022); starts at $5/month for basic dynos | Generous free tier (100 GB bandwidth, 300 build minutes/month); paid plans start at $19/user/month |
| Ideal Use Cases | Complex applications like e-commerce, social platforms, projects needing databases and backend processing | Blogs, marketing websites, documentation sites, other static or Jamstack applications |
| Developer Experience | More traditional PaaS with full backend environment and extensive language support | Quick setup, optimized for Jamstack and static sites |
| Scalability Requirements | Ideal for applications with high traffic variability due to automatic scaling capabilities | Best for static content scaling; backend scaling limited to serverless functions |
| Cost-Effectiveness | Can become costly for larger applications with add-ons and database support | Cost-effective for static sites and small projects; free tier available |
| Best For | Full-stack applications needing robust backend and database support | Frontend-focused Jamstack applications with minimal backend requirements |
Use Cases and Specialization
- Netlify: Netlify is optimized for static websites and Jamstack applications. The Jamstack architecture, which decouples the front end and back end, enables fast load times, enhanced security, and scalability. Netlify is particularly suited for blogs, marketing websites, and documentation sites where minimal backend processing is required.
- Heroku: Heroku is designed for full-stack applications requiring backend processing and database support. It’s an ideal choice for complex applications like e-commerce sites, social platforms, and applications with user accounts, as it supports a range of backend languages and integrates well with databases.
Key Features
- Netlify:
- Jamstack Specialization: Ideal for decoupled architectures with static content and serverless functions.
- Global CDN: Ensures fast content delivery worldwide by caching static assets on a global network.
- Serverless Functions: Allows limited backend capabilities for Jamstack projects without a dedicated server.
- Built-in Form Handling and Identity Management: Supports user interactions and simple authentication with Netlify Identity.
- Continuous Deployment from Git: Simplifies deploying updates directly from Git repositories.
- Heroku:
- Fully Managed Backend Environment: Supports backend setups with multiple programming languages and server-side processing.
- Language Support: Offers broad language support (e.g., Ruby, Python, Java, and Node.js).
- Add-On Marketplace: Extends functionality with services like monitoring, caching, and databases (PostgreSQL, Redis).
- Automatic Scaling with Dynos: Heroku’s dynos (virtual machines) allocate resources and automatically scale as needed.
- Comprehensive Database Support: Heroku’s managed databases allow for complex data storage and processing.
Pricing
- Netlify:
- Generous Free Tier: Offers 100 GB bandwidth and 300 build minutes per month, making it cost-effective for smaller static sites.
- Paid Plans: Start @ $19 per user per month, with additional features for larger projects or higher bandwidth needs.
- Heroku:
- No Free Tier: As of November 2022, Heroku no longer provides a free tier, impacting hobbyists and small projects relying on free hosting.
- Pricing Starts at $5 per Month: Basic plans allocate resources with dynos (virtual computing units) based on memory and CPU, but pricing can escalate with larger applications needing more add-ons or database support.
Deployment and Scaling
- Netlify: Known for continuous deployment from Git repositories, which simplifies the development workflow. Its global CDN ensures swift content delivery for static sites by caching content globally.
- Heroku: Offers an intuitive deployment process through Git and handles the backend setup for full-stack applications, including databases. Automatic scaling adapts to traffic, allowing the application to handle high loads smoothly.
Developer Experience
- Netlify:
- Rapid Setup for Static Sites: Quick to set up and deploy, making it an appealing option for developers prioritizing fast, Jamstack-focused deployment cycles.
- Heroku:
- PaaS for Full-Stack Flexibility: Suitable for backend development, supporting various programming languages and database configurations.
- Commonalities: Both platforms feature user-friendly interfaces that simplify deployment and management, streamlining workflows for developers.
Considerations
- Netlify:
- Cost-Effective for Static Sites: Ideal for projects that don’t need extensive backend resources.
- Backend Limitations: Not suited for long-running processes or applications with real-time requirements, as serverless functions are limited compared to a full backend server.
- Heroku:
- Higher Cost for Complex Backend Support: Provides a full backend environment with more robust database and processing capabilities, though costs can be higher for larger applications.
- Unnecessary for Simple Static Sites: Its extensive backend features may be redundant for basic static sites.
Heroku vs. Netlify FAQ
Q: What are the key differences between Heroku and Netlify?
- Focus: Heroku is a Platform as a Service (PaaS) that supports both frontend and backend applications, while Netlify specializes in static sites and Jamstack applications.
- Serverless Functions: Both platforms offer serverless functions, but Netlify’s are more limited compared to Heroku’s server-side processing capabilities.
- Integrations: Netlify has built-in features like form handling and identity management. Heroku offers a wide array of add-ons for databases, caching, monitoring, and more.
- Pricing: Heroku discontinued its free tier, while Netlify offers a generous free tier with 100 GB bandwidth and 300 build minutes each month.
Q: Which platform is better for static sites and frontend applications?
- Netlify is generally the better choice for static sites and frontend applications because:
- It’s optimized for Jamstack architecture, enabling easy deployment for static sites.
- Its free tier is suitable for small projects or personal sites.
- It offers built-in features like form handling and identity management that simplify frontend development.
Q: When should I use Heroku instead of Netlify?
- Use Heroku if your project requires:
- Robust Backend Support: Heroku is designed for full-stack applications needing complex backend logic and server-side processing.
- Multiple Programming Languages: Supports Ruby, Python, Java, and Node.js.
- Extensive Add-ons: Heroku’s add-on marketplace provides access to services like managed databases, caching, and monitoring tools.
Q: What are the pricing differences between Heroku and Netlify?
- Heroku: Pricing is based on resource usage, with charges for dynos (compute), databases, and add-ons. It can become costly for larger applications requiring more resources.
- Netlify: Offers a free tier, with paid plans starting at $19 per user per month, it is cost-effective for static or smaller Jamstack sites.
Q: How do the deployment processes compare on Heroku and Netlify?
- Heroku: Supports Git-based deployment and automatic scaling, which adapts resource allocation based on traffic.
- Netlify: Integrates with Git for continuous deployment, simplifying the development process for static and Jamstack sites.
Q: What are the key considerations when choosing between Heroku and Netlify?
Consider the following:
- Project Complexity: Netlify is better for static sites and Jamstack applications, while Heroku is suited for full-stack applications needing complex backend support.
- Scalability Needs: Heroku’s automatic scaling is advantageous for applications with variable traffic, while Netlify’s CDN scaling is ideal for static content.
- Budget: Netlify’s free tier is generous, while Heroku’s higher costs may make it less suitable for smaller projects.
- Developer Experience: Both platforms provide easy-to-use tools and interfaces.
Q: Can I use both platforms together?
Technically, yes, but it’s generally not recommended. Each platform is optimized for specific types of applications, and using both would likely add complexity without significant benefits. Instead, choose the platform that best meets your project’s needs.
Conclusion
Choosing between Heroku and Netlify depends on your project’s requirements:
- Netlify: Best for static sites and Jamstack applications, offering easy setup, a robust free tier, and quick deployment with limited backend needs.
- Heroku: Suited for full-stack applications requiring backend support and database integration. Though more costly, it provides the flexibility and scalability necessary for complex applications.
Check out our other comparisons here:
Vultr vs DigitalOcean: Which Cloud Hosting Platform Is Right for You?
Choosing the right cloud hosting platform can make or break your app’s performance, cost-efficiency, and scalability. Two of the most developer-friendly VPS providers on the market today are Vultr and DigitalOcean. While they appear similar at first glance, there are key differences that can significantly impact your experience depending on your technical skill level, project needs, and performance requirements.
This guide breaks down the pros and cons of both services to help you make the best choice.
Quick Comparison Table
| Feature/Category | Vultr | DigitalOcean |
|---|---|---|
| Performance | High Frequency, Bare Metal | Consistent, stable |
| Beginner Friendly | ❌ Complex UI, few tutorials | ✅ Clean UI, rich docs |
| Windows Hosting | ✅ Supported | ❌ Not supported |
| Custom ISO Upload | ✅ Yes | ❌ No |
| Managed Services | ❌ Limited | ✅ App Platform, DB, k8s |
| Global Data Centers | 30+ locations | ~15 locations |
| GPU/AI Hosting | ✅ Supported | ❌ Not available |
| Pricing Transparency | ⚠️ Varies by region | ✅ Flat, predictable |
Ease of Use & Developer Experience
DigitalOcean is known for its simplicity. Its dashboard is clean, its onboarding is fast, and its documentation library is one of the best in the industry. Whether you’re a beginner spinning up your first droplet or a small team deploying a SaaS app, DigitalOcean provides a low-friction experience.
Vultr, on the other hand, gives developers more advanced tools and configuration options but lacks the same level of polish in its UI or documentation. It’s more powerful, but less guided.
Performance & Infrastructure
When it comes to raw speed, Vultr has the edge. Its High Frequency Compute and Bare Metal servers outperform DigitalOcean in CPU-intensive tasks, making it a great choice for gaming servers, web scraping, and ML inference.
DigitalOcean is more than fast enough for most apps and websites, but doesn’t match Vultr in peak CPU and disk benchmarks.
Managed Services & Ecosystem
If you want a low-maintenance deployment pipeline, DigitalOcean is the winner. It offers:
- App Platform (a Heroku-like PaaS)
- Managed Databases (PostgreSQL, Redis, etc.)
- Managed Kubernetes
These tools let you skip most of the sysadmin work and focus on your code.
Vultr is more IaaS-focused. You get compute and storage, but not much in the way of managed services. You’ll need to build and manage your own stack.
Global Reach & Edge Deployment
Vultr has a far greater global footprint, with 30+ data centers around the world — including underserved regions like South America, India, South Africa, and Israel.
DigitalOcean covers major regions like the US, EU, and parts of Asia, but has fewer global options.
If latency or edge delivery is critical, Vultr is the better pick.
Pricing & Value
- DigitalOcean offers flat, transparent pricing no matter where your servers are hosted. DDoS protection is included, and you can estimate your bill with near-perfect accuracy.
- Vultr offers cheaper entry-level instances (even as low as $2.50/month for IPv6-only), but charges extra for features like DDoS protection, backups, and snapshots. Pricing also varies by region.
For predictable SaaS billing, DigitalOcean wins. For extreme budget-conscious builds, Vultr may be better.
Support & Documentation
DigitalOcean:
- 24/7 ticket support on all plans
- Paid support plans with SLAs
- 6,000+ tutorials and community guides
Vultr:
- Ticket-only support
- Smaller documentation base
If you’re new or need hand-holding, DigitalOcean offers more help and guidance.
Best Use Cases for Each Platform
✅ Choose DigitalOcean If You’re:
- Launching a SaaS or MVP with a small team
- A solo developer who wants managed services
- Building a web app or API that doesn’t require GPU or edge deployments
✅ Choose Vultr If You’re:
- Running Windows Server, custom OS, or ISO
- Deploying to underserved regions
- Needing raw performance (e.g. game server, inference)
- Building self-managed infrastructure with advanced networking or bare metal
Conclusion: Which Should You Choose?
DigitalOcean is ideal if you value simplicity, support, and managed services. It’s a perfect launchpad for developers, startups, and teams who want to focus on building rather than maintaining.
Vultr is better for power users who want full control, custom OS environments, or high-performance compute — especially when deploying globally or on a tight budget.
Both are great platforms. The best one depends on your goals.
FAQ
Q: Can I host a Windows app on DigitalOcean?
A: No, DigitalOcean does not support Windows. Vultr does.
Q: Which is faster — Vultr or DigitalOcean?
A: Vultr’s High Frequency Compute is faster for CPU and disk-heavy tasks.
Q: Can I run AI models or use GPUs?
A: Only Vultr supports GPUs and AI inference as of 2025.
Q: Which one is more beginner-friendly?
A: DigitalOcean — by a wide margin, thanks to its UI, guides, and managed services.
Need help deciding which is best for your project? Drop your stack or use case in the comments!
How to Create a DigitalOcean Droplet (Step-by-Step Guide for Beginners)
I used to think cloud servers were only for developers or IT pros. But last week, I launched my own DigitalOcean Droplet—and it took less than a minute. I have limited experience with Linux servers beyond basic hosting—and yet here I am, running my own virtual server with full root access.
In this post, I’ll walk you through exactly how I did it, step by step. Whether you’re launching a website, hosting a web app, or just want to learn something new, you can do this too.
What Is a DigitalOcean Droplet?
Think of a Droplet as your own personal computer in the cloud. It’s a virtual private server (VPS) that you can use for nearly anything:
- Hosting websites and blogs
- Running apps like Node.js, Flask, or Django
- Learning Linux commands hands-on
- Setting up game servers or dev environments
Unlike shared hosting, you get total control, higher speed, and better scalability.
Why I Chose DigitalOcean
I compared several VPS providers, but DigitalOcean stood out:
- Fast setup: You can literally launch a Droplet in under 60 seconds.
- Affordable: Plans start at just $5/month. Click here to try our DigitalOcean pricing calculator.
- Developer-friendly: Clean UI and helpful documentation.
- Free trial: They give you $100 in credits to get started.
Plus, the experience felt tailored for beginners. I didn’t feel lost at any point.
Want $200 DigitalOcean Credit? Claim It Here
Step-by-Step: How I Launched a Droplet in 60 Seconds
Here’s the exact process I followed:
1. Sign up for DigitalOcean
Visit digitalocean.com and create an account. You’ll get a $100 credit for 60 days if you’re new.
2. Click “Create Droplet”
After logging in, click the “Create” button in the upper-right and select “Droplet.”
3. Choose an Image
I chose Ubuntu 22.04 LTS — it’s stable, well-supported, and beginner-friendly.
4. Select a Plan
I picked the Basic Shared CPU plan with 1GB RAM. It only costs $5/month and is perfect for learning and small projects.
5. Choose a Data Center
I selected a region close to me (New York) to ensure fast response times.
6. Authentication
You can use an SSH key or a root password. I used an SSH key—DigitalOcean helps you generate one during setup if needed.
7. Name Your Droplet and Launch
I gave my Droplet a simple name: first-droplet. Then I hit “Create Droplet.”
That’s it. Within 60 seconds, my server was live and ready to go.
What Happened Next
DigitalOcean immediately gave me an IP address. I opened my terminal and logged in:
ssh root@your_droplet_ipBoom. I was inside my server. I felt like a real developer—even though I was just following instructions.
I had full root access and could do anything: install Nginx, set up a database, host files—you name it.
What You Can Do With Your Droplet
Here are a few things you can try right after creating your server:
- Install a Web Server: Nginx or Apache
- Host a Website or Blog: Use WordPress or a static site generator
- Set Up a Domain Name: Point your domain to your droplet’s IP
- Install SSL: Use Let’s Encrypt for a free HTTPS certificate
Need help with these steps? DigitalOcean’s tutorials are excellent.
Bonus Tips for Beginners
- Use UFW firewall:
ufw allow OpenSSH ufw enable - Take snapshots: Back up your Droplet before making big changes.
- Use Cloudflare: For DNS, CDN, and DDoS protection.
- Create a non-root user: For safer long-term server usage.
Final Thoughts
If I can do it in 60 seconds with no prior server experience, you absolutely can too.
Whether you’re launching your first website or building the foundation for your next big project, a DigitalOcean Droplet gives you control, flexibility, and speed.
👉 Learn more here and get some low cost credits to try it out.
How to Build a Fast, Free API Proxy That Just Works (Using Cloudflare Workers)
Tired of hitting CORS errors when trying to fetch data in the browser? Want to keep your API keys safe and stop spinning up full backend servers just to call an endpoint?
You’re not alone. And the good news is: you don’t need a traditional backend to solve these problems.
With Cloudflare Workers, you can create a fast, secure, and completely free API proxy that just works—in minutes. Whether you’re building a side project, hacking together automations, or launching a full-on SaaS, this is a game-changer.
Let’s walk through it step-by-step.
🌐 What Is a Cloudflare Worker (and Why It’s Perfect for Proxies)
Cloudflare Workers are serverless functions that run on Cloudflare’s global edge network. That means:
- No server setup
- Insanely fast performance (close to the user)
- Free tier with generous limits
- Great for simple API calls, proxies, and automations
In short: the perfect place to drop in a fast, secure API proxy.
🔨 When and Why to Use an API Proxy
Here’s when a proxy helps:
- ✅ Bypass CORS issues when making requests from the browser
- ✅ Hide secret API keys from frontend code
- ✅ Modify requests or responses (add headers, reformat JSON)
- ✅ Chain multiple API calls behind one endpoint
- ✅ Add logging, rate limits, or authentication
If you’re building in Replit, Vercel, Netlify, or just don’t want a backend—this is for you.
💪 Step-by-Step: Build Your Proxy in 10 Minutes
🚀 Step 1: Set Up Your Cloudflare Account
- Visit workers.cloudflare.com
- Create a free account
🔧 Step 2: Install Wrangler (CLI Tool)
npm install -g wrangler
wrangler login
🔺 Step 3: Generate a New Project
wrangler init my-api-proxyChoose “yes” to the default TypeScript/JavaScript template.
🧠 Step 4: Add Proxy Logic (src/index.js or src/index.ts)
Replace the contents with this basic proxy example:
export default {
  async fetch(request) {
    const apiUrl = 'https://api.openai.com/v1/chat/completions';

    const body = await request.text();
    const response = await fetch(apiUrl, {
      method: 'POST',
      headers: {
        'Authorization': `Bearer ${OPENAI_KEY}`,
        'Content-Type': 'application/json',
      },
      body
    });

    return new Response(await response.text(), {
      status: response.status,
      headers: { 'Content-Type': 'application/json' },
    });
  }
}
🔐 Step 5: Secure Your API Key
In your wrangler.toml, add:
[vars]
OPENAI_KEY = "sk-xxxxxxxxxxxxxxxx"
Cloudflare will inject this as a secure environment variable.
🌎 Step 6: Deploy Your Worker
wrangler deployDone! You’ll get a live URL like:
https://my-api-proxy.your-namespace.workers.dev📁 How to Use the Proxy in Your Frontend
Now that your proxy is live, you can call it like this:
const res = await fetch('https://my-api-proxy.workers.dev', {
  method: 'POST',
  headers: { 'Content-Type': 'application/json' },
  body: JSON.stringify({
    model: "gpt-3.5-turbo",
    messages: [{ role: "user", content: "Hello!" }],
  })
});
const data = await res.json();
No CORS error. No key leakage. Just clean responses.
🧰 Power Features to Add Later
- ✅ Query param passthrough
- ✅ Auth/token checks
- ✅ Rate limiting (per IP or header)
- ✅ KV storage or caching
- ✅ Support multiple APIs with route matching
You can also handle GET, PUT, etc., and validate payloads as needed.
📅 Free Tier Limits to Know
Cloudflare Workers’ free plan includes:
- 100,000 requests/day
- 1,000 scripts per account
- 10ms CPU time/request
That’s more than enough for indie projects, demos, and MVPs.
✅ Conclusion: Start Proxing Like a Pro
With just a few lines of code, you’ve built a:
- Globally distributed API proxy
- That hides secrets
- Beats CORS
- Runs for free
No server required.
Now you can safely call third-party APIs from your frontend, automation tools, or no-code platforms without compromise.