Uncategorized
Stop Guessing: How to Shell Into Your Docker Containers to Debug Errors
You’ve spun up a Docker container. It’s running, but it’s not behaving correctly. Maybe the application is throwing 500 errors, or maybe it’s just silently failing to connect to the database.
You check docker logs, but the output is cryptic—or worse, empty. You feel locked out.
Docker containers are designed to be “sealed boxes.” This isolation is great for stability and security, but it’s a nightmare for debugging when you need to poke around the filesystem to see what’s actually happening.
You don’t need to rebuild the image or add complex logging just to see what’s wrong. You just need to open a side door.
That side door is docker exec.
In this guide, we’ll walk through how to interactively enter a running container, why the command works, and how to handle edge cases like Alpine Linux or permission errors.
Run Docker Free With $200 DigitalOcean Credit
Step 1: Identify Your Target
Before you can enter a container, you need its unique identifier. Open your terminal and list your running containers:
Bash
docker ps
You will see output that looks like this:
Plaintext
CONTAINER ID   IMAGE          COMMAND                  STATUS          NAMES
a1b2c3d4e5f6   nginx:latest   "/docker-entrypoint.…"   Up 10 minutes   my-web-server
You can target the container using either the CONTAINER ID (the alphanumeric string a1b2c3d4e5f6) or the NAME (my-web-server). The name is usually easier to remember.
Step 2: The Golden Command
To open a shell inside that container, run the following command:
Bash
docker exec -it my-web-server /bin/bash
If successful, your terminal prompt will change. You are no longer on your host machine; you are inside the container, usually logged in as root or the default application user.
From here, you can use standard Linux commands like ls, cat, top, or curl to debug your application from the inside out.
Deconstructing the Command
If you just copy-paste the command, you might not understand why it fails in certain scenarios. Here is exactly what those flags are doing:
-
exec: This tells Docker to run a command inside an existing container (as opposed torun, which starts a new one). -
-i(Interactive): This keeps “Standard Input” (STDIN) open. It allows the container to receive the keystrokes you type. -
-t(TTY): This allocates a pseudo-terminal. It simulates a real terminal environment so you get a command prompt and formatted output. -
/bin/bash: This is the actual command we are running. We are launching the Bash shell program.
Troubleshooting: When /bin/bash Fails
The command above works for 90% of containers (Ubuntu, Debian, CentOS based). However, you will eventually run into an error that looks like this:
OCI runtime exec failed: exec: “/bin/bash”: stat /bin/bash: no such file or directory
This usually happens because you are using a lightweight image, such as Alpine Linux. To keep the image size small, Alpine does not include Bash. It uses the standard Bourne shell (sh) instead.
The Fix: simply change the shell command at the end:
Bash
docker exec -it my-web-server /bin/sh
Advanced Tricks
1. Entering as Root
Sometimes you enter a container, but you are logged in as a restricted user (like www-data or node). If you try to install a debug tool or edit a config file, you’ll get a “Permission Denied” error.
You can force Docker to log you in as the root user (User ID 0) by adding the -u flag:
Bash
docker exec -u 0 -it my-web-server /bin/bash
2. For Docker Compose Users
If you are running your stack via Docker Compose, you don’t need to look up the specific container ID with docker ps. You can use the service name defined in your docker-compose.yml file:
Bash
docker compose exec web_service /bin/bash
A Critical Warning: exec vs. attach
While searching for answers, you might see tutorials recommending docker attach.
Avoid using docker attach for debugging.
-
execcreates a separate process (a side session) alongside your application. -
attachconnects your terminal to the main process running the application (PID 1).
If you are “attached” to the main process and you hit Ctrl+C to exit, you will kill the application and the container will stop. With exec, you can enter and exit freely without affecting the running service.
Want $200 DigitalOcean Credit? Claim It Here
Summary Cheat Sheet
| Goal | Command |
| Standard Shell | docker exec -it <name> /bin/bash |
| Alpine Linux (Lightweight) | docker exec -it <name> /bin/sh |
| Force Root User | docker exec -u 0 -it <name> /bin/bash |
| Using Docker Compose | docker compose exec <service> /bin/bash |
Now that you’re inside, you can check configuration files, verify permissions, or test network connectivity manually. Just remember: containers are ephemeral. Any changes you make to files inside the container will be lost if you delete the container. Use exec for debugging, not for permanent updates.
Stop Hard-Wiring APIs Into Your AI — Meet MCP
If you’ve ever tried building an AI agent that does more than just chat, you already know the pain: every new capability means another API integration. One for your CRM. Another for analytics. Yet another for Cloudflare, Stripe, or Notion.
Each API has its own authentication, data formats, quirks, and limits. And when those change? Your fragile integrations break. Worse, you risk exposing API keys directly inside prompts — a security nightmare.
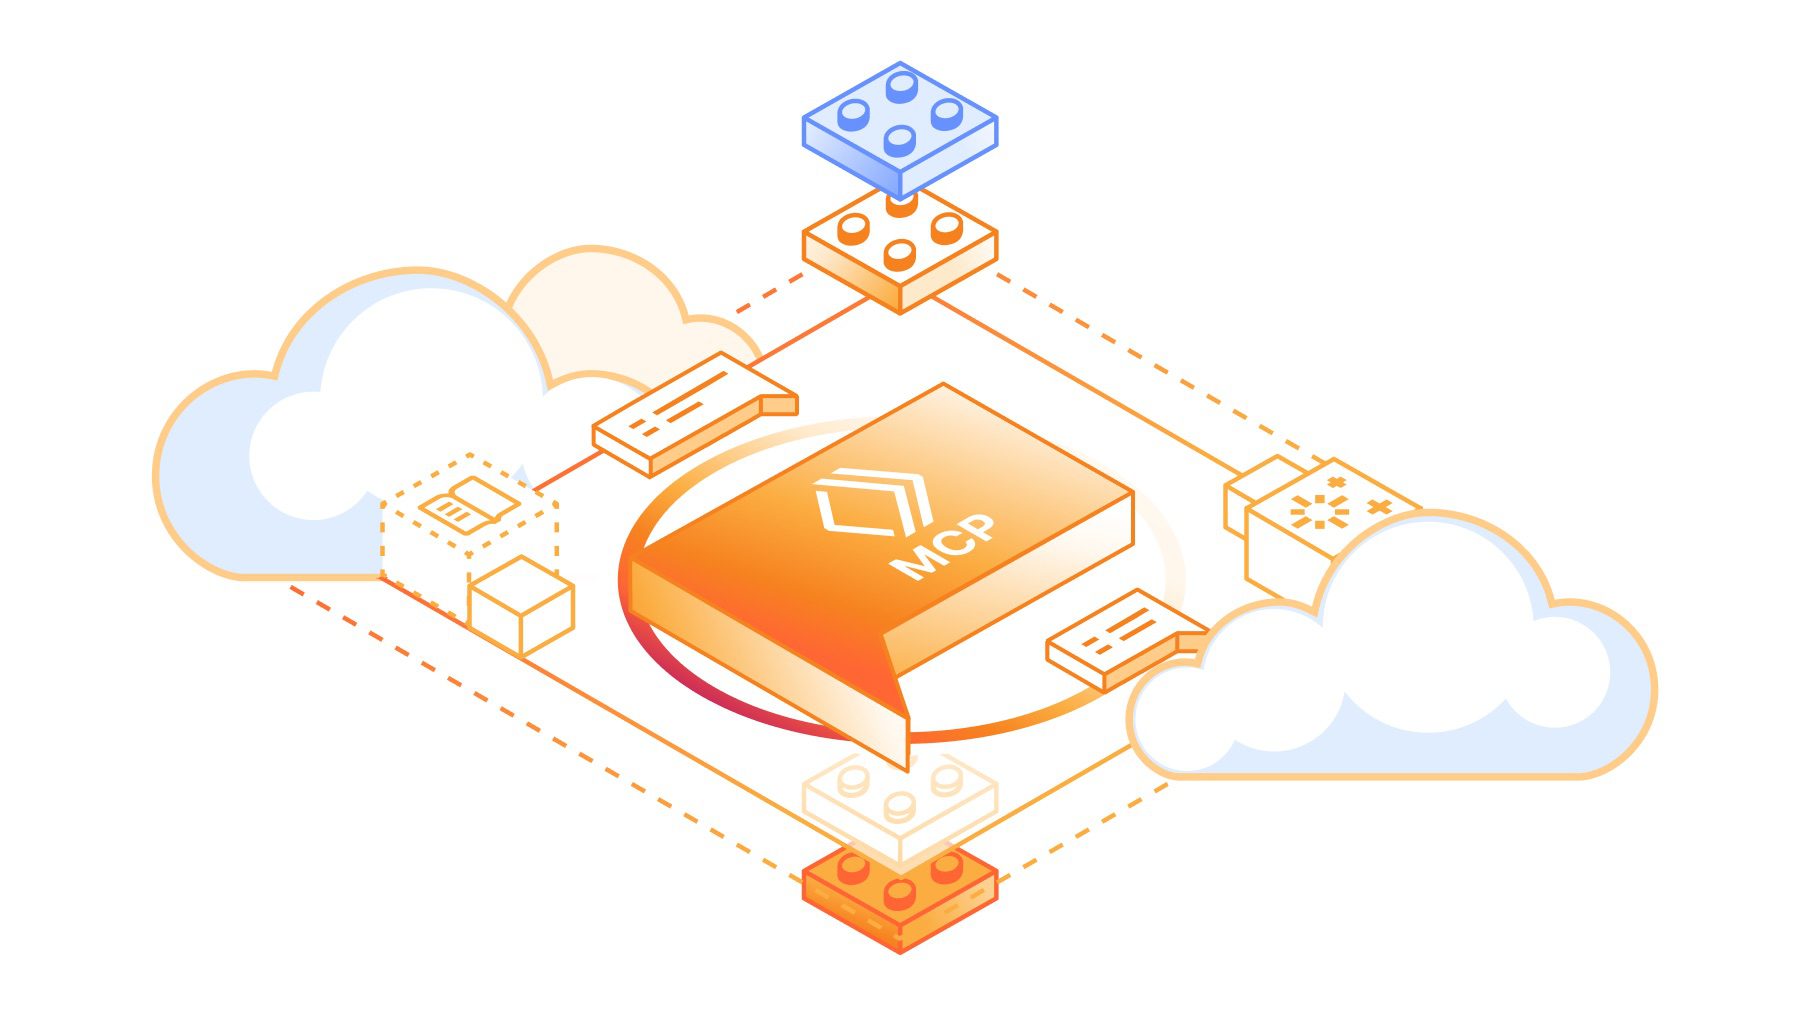
That’s where MCP (Model Context Protocol) comes in. Backed by Cloudflare, Anthropic, and a growing ecosystem of agent platforms, MCP is quickly becoming the “USB-C of AI tools.”
What Is MCP?
MCP — the Model Context Protocol — is an open standard that defines how AI agents connect to external tools, services, and data.
- AI Clients (Hosts): Your agent or AI app (like Claude, Cursor, Windsurf).
- MCP Servers: Services that expose capabilities (like “get DNS records” or “fetch analytics”) in a safe, standard way.
Instead of hard-wiring dozens of APIs into your LLM, you connect it once to MCP. The MCP servers handle the rest.
How MCP Works (Without the Jargon)
Here’s the flow, simplified:
- Handshake: Your AI client connects to an MCP server.
- Tool Discovery: The server says, “Here’s what I can do” — e.g., add firewall rules, query logs, or fetch customer data.
- Action: The AI calls one of those tools based on your request.
- Result: The server executes the action and returns structured results (usually lightweight JSON).
- Response: The AI explains it back to you in plain English.
🔌 Think of it like plugging a laptop into a monitor: your laptop doesn’t need to know the wiring — it just needs HDMI/USB-C. MCP is that universal port for AI agents.
Why MCP Matters for Agent Builders
Here’s why serious AI developers are paying attention:
- Simplicity → Stop reinventing the wheel with custom API wrappers.
- Security → API keys live in the MCP server, not inside an LLM prompt.
- Scalability → Add or swap services without rewriting your agent’s core logic.
- Portability → Works across multiple AI clients — Claude, Cursor, Windsurf, and more.
As someone who’s built integrations the “old way,” I can tell you: managing half a dozen fragile API hookups is not sustainable. MCP replaces that mess with one clean, reliable interface.
Real-World Examples
- Cloudflare MCP Servers: Imagine telling your agent, “Block traffic from Russia” — and it adds the firewall rule through Cloudflare safely via MCP.
- Local MCP Servers: Developers are already spinning up MCP servers to query local databases or run shell commands from within an AI workflow.
- Enterprise MCP Portals: Cloudflare now offers MCP Server Portals (in beta), giving teams dashboards, observability, and fine-grained control over which AI agents can call which tools.
This isn’t theory — it’s happening right now.
Local vs Remote MCP: Where Should You Run It?
- Local MCP: Run a server on your laptop for fast prototyping. Great for dev workflows and personal tools.
- Remote MCP (self-hosted): Use a reverse proxy (like Nginx) if you want your MCP server accessible online.
- Cloudflare-Hosted MCP: Let Cloudflare handle the scaling, TLS, and global edge performance. Perfect for production and enterprise use cases.
Speed isn’t a major bottleneck since MCP deals in small JSON payloads — not big data streams. It’s about control and security, not raw throughput.
The Bigger Picture: MCP as the Standard
Just like USB-C replaced dozens of connectors, MCP is positioned to replace fragile, one-off AI integrations. Anthropic, Cloudflare, and the broader ecosystem are betting on it.
If you’re building AI agents today, MCP isn’t optional for long. It’s the foundation that will make your agents:
- More reliable
- More secure
- Easier to extend
Conclusion: Don’t Reinvent the Wheel
Hard-wiring APIs into your LLM might work for a demo. But if you want to build agents that scale and survive, MCP is the smarter path forward.
Alteryx for Coders: When Low-Code Analytics Makes Sense (and When It Doesn’t)
If you’re a coder, you probably have strong feelings about “no-code” tools. Most of the time, they feel like training wheels bolted onto a bicycle you already know how to ride. Why would you give up the flexibility of Python, SQL, or R for a drag-and-drop interface?
But here’s the thing: Alteryx isn’t just for analysts who don’t know how to import pandas. It’s a data automation and analytics platform that coders can actually get mileage from—if you know where it makes sense.
Let’s unpack what Alteryx does, what it doesn’t, and when it’s worth considering instead of rolling yet another custom ETL pipeline.
What Is Alteryx in Developer Terms?
Think of Alteryx as a pre-packaged mashup of tools you already know:
-
Visual ETL = pandas + SQL + Airflow, but in a drag-and-drop GUI.
-
Predictive Models = scikit-learn starter kits for regression, clustering, and forecasting.
-
Scheduling = cron jobs with logging and error handling built in.
-
Code Integration = Python, R, and SQL scripts inside workflow nodes.
Basically, it’s a way to automate data prep and analytics without hand-coding every single step. You still can inject code where needed—but you don’t have to write all of it.
Features That Actually Matter to Coders
Plenty of marketing glosses over the technical details, so here’s the short list of features coders care about:
-
300+ Data Connectors: Databases, APIs, spreadsheets, cloud warehouses.
-
Automation: Build workflows once, run them on a schedule—no repetitive scripting.
-
Analytics Toolbox: Regression, clustering, geospatial joins, text mining.
-
Custom Scripting: Python, R, SQL snippets live inside workflows.
-
Workflow Sharing: Package processes into apps non-coders can run without breaking your code.
-
Caching & Debugging: Step through data at each node without littering your repo with
print()statements.
Pros: Why Coders Might Actually Like It
-
Faster Prototyping: Instead of coding ETL by hand, drag-and-drop a pipeline and test in minutes.
-
Team Onboarding: Hand workflows to non-technical teammates—no need to train them on pandas or SQL joins.
-
Reusable Workflows: Automate boring data cleanup tasks you’d otherwise script over and over.
-
Hybrid Flexibility: Drop in Python or R whenever the GUI doesn’t cut it.
-
Cross-Team Bridge: Business analysts can run your workflows without pinging you for one-off scripts.
Cons: Why Coders Might Resist
-
The Price Tag: Around $5k/year per license. Compare that to free open-source stacks.
-
Scaling Limits: Workflows run in memory. Big joins on large datasets? Expect crashes.
-
Version Control Pain: No native Git integration. Sharing means emailing
.yxmdfiles like it’s 2005. -
Limited Visualization: Built-in charts are barebones; you’ll still need Tableau, Power BI, or code.
-
Vendor Lock-In: Workflows aren’t portable outside of Alteryx. Pandas scripts? Always will be.
Alteryx vs. Code-First Workflows
If you’re weighing Alteryx against a pure-code stack, here’s the trade-off:
-
Where Alteryx Wins: Speed, automation, and accessibility—especially in enterprise teams.
-
Where Code Wins: Flexibility, cost, scalability, Git-friendly workflows.
-
Hybrid Sweet Spot: Use Alteryx for repetitive prep + scheduling, and save raw code for modeling, APIs, or big-data pipelines.
When a Coder Should Actually Use Alteryx
-
You’re in an enterprise environment where teammates can’t (or won’t) code.
-
You need data cleanup across multiple messy sources—fast.
-
You’re prototyping pipelines before moving them into production.
-
You want to teach or collaborate without diving into regex or nested SQL CTEs.
When to Stick With Code Instead
-
You’re handling massive datasets better suited for Spark, Airflow, or dbt.
-
You’re budget-sensitive (Alteryx isn’t cheap).
-
You need tight version control and prefer Git-based workflows.
-
You dislike GUIs and want every step scripted, logged, and reproducible.
Conclusion
Alteryx isn’t a replacement for code—it’s a force multiplier when you need speed and collaboration. Coders shouldn’t dismiss it as just another no-code toy, but also shouldn’t rely on it exclusively.
If you’re buried in repetitive data prep or spending too much time writing glue code, Alteryx can buy back your hours. Just know that once you’re scaling beyond its memory limits or need production-grade pipelines, Python, SQL, and open-source stacks will always give you more control.
So the real question isn’t “Alteryx vs. code?”—it’s “When do I want a drag-and-drop multiplier, and when do I want raw code?”
White Label SaaS Software Examples: Pros, Cons, and Who Should Sell Them
White-label software is one of the fastest ways to launch a software business without writing a single line of code. Instead of spending years building your own SaaS, you can take an existing platform, rebrand it with your logo, and resell it as your own.
Agencies, consultants, and entrepreneurs are increasingly turning to white-label software to create new revenue streams and strengthen client relationships. But what’s really out there? And is it worth pursuing?
In this guide, we’ll break down 25 white-label software examples, explore the pros and cons of selling them, and show you who each option is best suited for.
What Is White Label SaaS Software?
White-label software is a ready-made product developed by one company and resold by another under their own brand.
Think of it like grocery store brands: the store doesn’t make the cereal, but it rebrands and sells it as its own. With software, this means:
-
You get a fully functional tool (CRM, email marketing, dashboards, etc.).
-
You apply your brand elements (logo, colors, custom domain).
-
You resell it to clients at a markup, keeping the profit.
This makes it possible to enter the software business without heavy development costs or technical teams.
Who Is White Label Software For?
White-label software works best for:
-
Agencies (marketing, SEO, web design, HR) – who want to provide clients with tools beyond services.
-
Consultants & Coaches – who want to add digital platforms to their offerings.
-
SaaS Founders – who want to expand features without building from scratch.
-
Niche Specialists (dentists, gyms, real estate, healthcare, etc.) – who want to package software for a specific vertical.
Top 25 White Label Software Examples
Here are 25 proven platforms you can rebrand and resell.
🔹 Email Marketing & Automation
-
Moosend – Affordable email marketing automation with white-label branding.
-
CakeMail – Multilingual, lightweight email platform ideal for small businesses.
-
ActiveCampaign – Advanced marketing automation and CRM with reseller options.
-
Howuku – CRO platform offering heatmaps, session replays, and A/B testing.
🔹 Dashboards & Analytics
-
AgencyAnalytics – SEO, PPC, and social reporting dashboards with client logins.
-
Klipfolio – Real-time business dashboards for data consultants and agencies.
-
DashThis – Marketing dashboard builder with custom branding.
-
DashClicks – All-in-one agency management with white-label reporting.
🔹 CRM & All-in-One Platforms
-
GreenRope – CRM with sales, marketing, and project management features.
-
AllClients – Simple, consultant-friendly CRM with rebranding options.
-
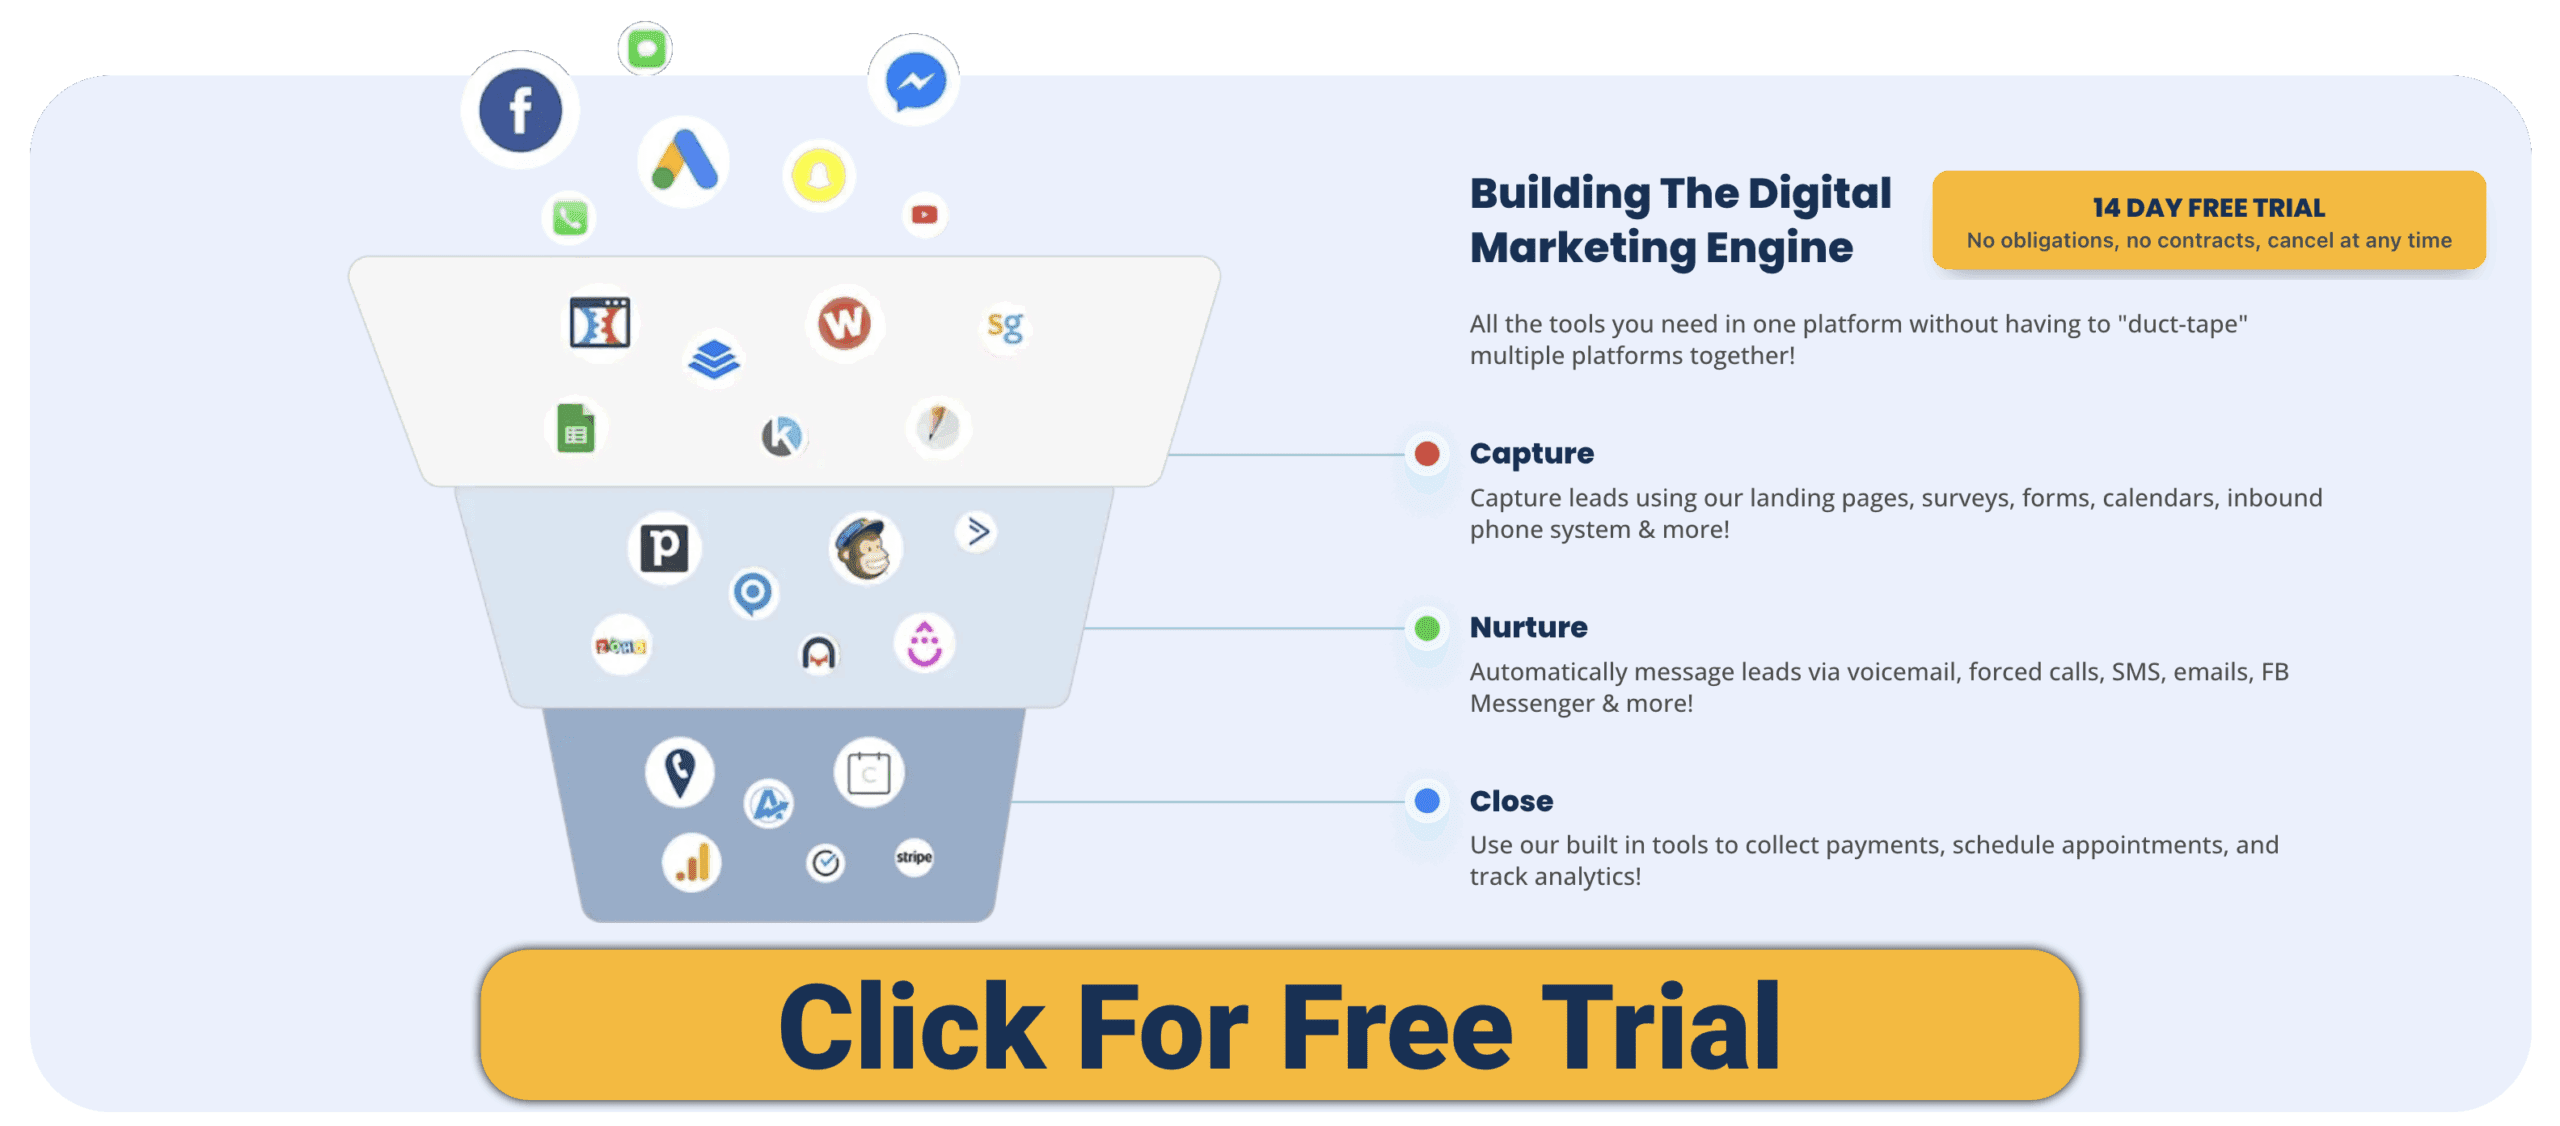
GoHighLevel – Popular “SaaS-in-a-box” CRM and funnel builder for agencies.
🔹 Website & Funnel Builders
-
Simvoly – Combines websites, funnels, and e-commerce in one platform.
-
Weblium – Drag-and-drop site builder with white-label plans.
-
WordPress – Open-source CMS easily white-labeled with plugins.
-
Landingi – Landing page builder with custom domain support.
-
Convrrt – Landing page builder that integrates directly into SaaS platforms.
-
Duda – Website builder tailored for agencies, with client dashboards.
🔹 Chatbots & Lead Capture
-
WotNot – No-code chatbot platform with agency-focused licensing.
-
Mailmunch – Lead capture forms, pop-ups, and email tools.
-
VivifyScrum – Agile project management with white-label branding.
-
Zapier – Integration platform with embeddable automation APIs.
🔹 Payroll, HR & E-commerce
-
Playroll – Global payroll and Employer-of-Record platform.
-
Ecwid – E-commerce platform that plugs into websites and apps.
-
Magento (Adobe Commerce) – Enterprise-level e-commerce with partner programs.
🔹 ERP & Operations
-
Sellful – AI-powered ERP (websites, CRM, invoicing, POS) built for agencies to resell.
(Tip: Include screenshots, logos, or comparison tables for EEAT credibility.)
Pros of Selling White Label Software
-
✅ Fast time to market – Launch in weeks instead of years.
-
✅ Lower costs – Avoid millions in dev and server infrastructure.
-
✅ Recurring revenue – Subscription model builds predictable income.
-
✅ Brand authority – You look like a software provider, not just a service vendor.
-
✅ Scalable – Multi-tenant platforms let you onboard dozens of clients easily.
Cons of Selling White Label Software
-
❌ Vendor lock-in – You rely on the developer’s uptime and updates.
-
❌ Limited customization – Branding is flexible, but features are usually fixed.
-
❌ Licensing costs – Vendors typically charge monthly fees per client or per seat.
-
❌ Support burden – Clients expect you to handle troubleshooting.
-
❌ Competition risk – Many resellers may use the same platform.
How to Choose the Right White Label Software
-
Match your niche: Pick tools your target clients already need (dentists = appointment CRM, agencies = dashboards).
-
Vet the vendor: Look for solid uptime, security, and compliance certifications.
-
Check pricing model: Ensure margins work after licensing costs.
-
Consider scalability: Can it handle 5 clients today and 500 tomorrow?
-
Support model: Know who answers the phone when clients need help — you or the vendor.
FAQs About White Label Software
-
What’s the difference between white-label and private-label software?
White-label is made for reselling at scale, while private-label often means a custom single deployment. -
Is it profitable for small businesses?
Yes — especially when bundled with services like marketing or consulting. -
Can I add my own features?
Usually not, but some vendors offer APIs or developer programs. -
What industries benefit most?
Marketing, e-commerce, HR/payroll, and niche service businesses.
Expert Tips & Best Practices
-
Start with one platform and test it with a pilot client.
-
Bundle software with services to increase stickiness (e.g., “ads + reporting dashboard”).
-
Use niche positioning to stand out (“CRM for real estate agents” > “generic CRM”).
-
Always have an exit plan in case your vendor changes pricing or goes under.
Conclusion
White-label software is a shortcut into the SaaS world — but success depends on how you package, sell, and support it.
If you’re an agency owner, consultant, or entrepreneur, choosing the right platform could mean the difference between just reselling a tool and creating a true recurring revenue business.
HighLevel vs Kajabi: All-in-One CRM or Course & Content Powerhouse?
For coders, freelancers, and SaaS builders, there’s often a key decision: Do I need a platform to manage clients and automate funnels, or one to host courses and monetize knowledge?
That’s where HighLevel (GoHighLevel) and Kajabi come into play. Both platforms claim to be all-in-one business solutions — but they serve different masters. HighLevel is built as a CRM + funnel + automation hub, while Kajabi is designed as a course and content monetization platform.
Let’s compare them in detail.
Quick Comparison Snapshot
| Feature | HighLevel | Kajabi |
|---|---|---|
| Core Focus | CRM, funnels, automation, multi-channel marketing | Online courses, membership sites, content monetization |
| Pricing | $97–$497/mo flat (unlimited users) | $149–$399/mo (per user, tiered features) |
| CRM & Pipelines | Full CRM & pipeline tracking | Very limited (basic contacts + tagging) |
| Funnels & Websites | Full funnel & website builder | Website & landing page builder (content-first) |
| AI Tools | AI receptionist, chatbot, funnel builder | Basic AI (content generation, emails) |
| Automations | Multi-channel workflows (SMS, email, chat, calls) | Email automation, content drip campaigns |
| White-Label SaaS | Yes | No |
| Best Fit | Agencies, freelancers, SaaS founders | Course creators, coaches, educators |
Our Favorite CRM: Try GoHighLevel Risk Free
HighLevel: The CRM + Funnel Engine
HighLevel is made to help agencies, SMBs, and coders consolidate sales and marketing into one platform.
-
CRM & Pipelines – Manage leads, deals, and client relationships.
-
Funnels & Websites – Drag-and-drop builder for unlimited funnels and pages.
-
Multi-Channel Marketing – Email, SMS, voicemail drops, Messenger, Instagram DMs, live chat.
-
Automations – Visual workflow builder for nurturing and follow-ups.
-
AI Agents – AI receptionist, chatbots, funnel generator.
-
Memberships & Courses – Host digital products (but less polished than Kajabi).
-
White-Label SaaS – Resell HighLevel as your own branded software.
For vibe coders, HighLevel is like a Swiss Army knife for launching and managing businesses quickly — especially useful if you want to resell it as SaaS.
Kajabi: The Course & Content Powerhouse
Kajabi is purpose-built for knowledge businesses — people selling courses, coaching, or memberships.
-
Course Hosting – Upload videos, PDFs, audio, and create structured curriculums.
-
Websites & Landing Pages – Templates optimized for education and coaching.
-
Community Features – Kajabi Communities (built-in forums & group chats).
-
Email Marketing – Automated email campaigns and drip sequences.
-
Checkout & Subscriptions – Integrated payment system for one-time or recurring offers.
-
Analytics – Track student engagement, course completion, and revenue.
-
Integrations – Connects with Zapier, Stripe, and 3rd-party tools.
For coders who are also educators or coaches, Kajabi offers a clean, content-first ecosystem without needing extra plugins.
Pros & Cons
HighLevel Pros
-
Combines funnels, CRM, and automation in one.
-
Flat pricing (no per-user costs).
-
White-label SaaS mode (unique resell model).
-
AI-driven client-facing tools.
-
Multi-channel communication built-in.
HighLevel Cons
-
Course/membership features are basic compared to Kajabi.
-
Learning curve can overwhelm beginners.
-
Limited integrations unless on higher plan.
Kajabi Pros
-
Polished course and content hosting.
-
Integrated payments and subscriptions.
-
Clean UI, easy to set up.
-
Great for coaches and educators.
-
Built-in community features.
Kajabi Cons
-
Pricing increases as you scale.
-
Weak CRM (limited beyond tagging & email).
-
Less flexible for funnels and automations.
-
No SaaS reselling model.
Use Cases for Vibe Coders
-
Freelancers/Agencies → HighLevel makes sense if you manage client leads, pipelines, and want to resell SaaS. Kajabi is only relevant if you offer training.
-
SaaS Founders → HighLevel is ideal for funnels, onboarding, and customer nurturing. Kajabi works for education-based SaaS (customer training or knowledge monetization).
-
Educators/Coaches → Kajabi dominates with polished course delivery, payments, and community features.
-
Coders Who Automate → HighLevel offers prebuilt automation across channels; Kajabi’s automations are mostly email-based.
What Users Say
-
HighLevel: Praised for replacing multiple tools, especially by agencies. Criticism: steeper learning curve, UI clutter.
-
Kajabi: Loved for simplicity and polish. Criticism: expensive, weak CRM, limited funnels.
Our Favorite CRM: Try GoHighLevel Risk Free
FAQs
Which is more coder-friendly?
HighLevel — with workflows, APIs (on higher tiers), and SaaS resell mode. Kajabi is no-code and polished, but not deeply customizable.
Which is better for AI?
HighLevel has AI agents and funnel tools. Kajabi’s AI is limited to content writing.
Which is better for courses?
Kajabi, hands down. HighLevel can host courses, but Kajabi is purpose-built.
Which is more affordable?
HighLevel’s flat pricing can be cheaper for large teams. Kajabi is fine for solo creators but gets costly as you scale.
Final Verdict
-
Choose HighLevel if you need a CRM + funnel builder + automation hub and especially if you want to resell SaaS under your own brand. Great for agencies, freelancers, and SaaS founders.
-
Choose Kajabi if your business is courses, coaching, or memberships and you want a polished, all-in-one content monetization platform.
Bottom line: HighLevel is the CRM + funnel engine, Kajabi is the course & content powerhouse. Coders should decide whether they want to scale clients (HighLevel) or scale content (Kajabi).
Want to see more comparisons? Check out our other posts on CRMs!
n8n Pricing Explained: Which Plan Is Right for You?
Click For N8N Pricing
n8n — a powerful open-source workflow automation tool known for flexibility and a developer-friendly interface. But when it comes to pricing, how does it stack up? This guide breaks down n8n’s pricing (USD equivalents where helpful), what you actually get, and how to choose the right plan for production use.
n8n’s Cloud Pricing Model
Click here to see the latest pricing
| Feature | Starter ($20/mo) | Pro ($50/mo) | Enterprise (Custom) |
|---|---|---|---|
| Executions / Month | ~2,500 | ~10,000 | Custom |
| Workflows / Steps / Users | Unlimited | Unlimited | Unlimited |
| Concurrent Executions | ~5 | ~20 | 200+ |
| Shared Projects | 1 | 3 | Unlimited |
| Execution Insights | Short-term | 7 days | 365 days |
| Admin Roles & Global Variables | — | Yes | Yes |
| Environments | — | — | Yes |
| Git / Log Streaming / SSO | — | — | Yes |
| Support | Forum | Email + Forum | SLA / Priority |
n8n Cloud Plans
Click here to see the latest pricing
n8n offers both Cloud (hosted by n8n) and Self-Hosted options. Its pricing is based on workflow executions (a full workflow run), not per-step “tasks.” For complex automations, this can be more predictable than competitors that charge per task.

Don’t Just Read About It — Launch Your Own AI Workflow with n8n (No Cost)
n8n Cloud Plans (Hosted by n8n)
Best if you don’t want to manage servers, upgrades, or uptime.
Starter
- $24/month (or $20/month billed annually)
- ~2,500 workflow executions/month
- Unlimited workflows, steps, and users
- 1 shared project; ~5 concurrent executions
- Forum/community support
Pro
- $60/month (or $50/month billed annually)
- ~10,000 executions/month
- Unlimited workflows, steps, and users
- 3 shared projects; ~20 concurrent executions
- 7-day execution insights, admin roles, global variables, workflow history & execution search
Enterprise (Cloud)
- Custom pricing (contact n8n)
- Custom number of executions with unlimited workflows, steps, users
- Unlimited shared projects; 200+ concurrent executions
- 365-day insights, SAML/LDAP SSO, multiple environments, log streaming
- SLA-backed support and invoice billing

FREE: Launch Your Own AI Workflow
Self-Hosted Options
Run n8n on your own infrastructure for maximum control.
Community Edition (Self-Hosted)
- Free
- Unlimited workflows and executions
- Access to core features • Community support
- Ideal for developers, hobbyists, and small teams who can manage servers and updates
Business (Self-Hosted)
- Paid (contact n8n)
- Advanced collaboration, environments, built-in Git versioning
- SSO options, insights/logging, and scaling features
Enterprise (Self-Hosted)
- Custom pricing
- Everything in Business/Pro plus 200+ concurrency, extended retention, SLAs
Startup Plan
n8n offers a special plan for eligible startups:
- ~$400/month historically (<=20 employees, <$5M funding)
- Includes premium features from higher tiers
Which Plan Should You Choose?
- Just getting started? Try the free Community Edition or Starter if you want managed hosting.
- Growing team? Pro adds more executions plus collaboration and admin controls.
- Need SSO, SLAs, compliance? Choose Business or Enterprise.
- Eligible startup? Ask about the Startup Plan.
Unlock Your First Automation — Try n8n Free and Build Smarter, Faster
Pros & Cons by Plan
- Community (Self-Hosted) — Pros: Free, unlimited usage. Cons: You manage hosting/security.
- Starter (Cloud) — Pros: Low cost, easy. Cons: Execution cap, forum support only.
- Pro (Cloud) — Pros: More executions, insights, admin roles. Cons: Still capped executions.
- Business (Self-Hosted) — Pros: Git, SSO, environments. Cons: Paid, you manage infra.
- Enterprise — Pros: Compliance, SLAs, highest concurrency. Cons: High/custom pricing.
FAQ: Executions, Usage & Support
What is an “execution”? One full workflow run.
How do I estimate? Multiply run frequency × workflows.
How do I track usage? Cloud dashboards or self-hosted Business/Enterprise logs.
Is there support? Starter = forum. Pro = email+forum. Enterprise = SLA. Business (self-hosted) adds enterprise features.
Methodology & Editorial Standards
We validate against n8n pricing pages and changelogs, and update when pricing changes. Sources:
HighLevel vs Skool: All-in-One CRM or Community-First Platform?
If you’re building a business around coding, SaaS, or vibe projects, you’ll eventually face a choice: Do you need a system to capture leads and manage clients, or do you need a platform to build a community and deliver courses?
That’s where HighLevel (GoHighLevel) and Skool come in. Both are powerful, but they serve different masters: HighLevel is an all-in-one CRM and funnel platform, while Skool is a community-first platform with built-in courses and gamification.
Here’s how they compare for coders and creators in 2025.
Quick Comparison Snapshot
| Feature | HighLevel | Skool |
|---|---|---|
| Core Focus | CRM, funnels, automation, marketing | Community, courses, gamification |
| Pricing | $97–$497/mo flat (unlimited users) | $99/mo flat (per community) |
| CRM & Pipelines | Yes, full CRM | Very limited (basic member list) |
| Funnels & Websites | Full builder | None |
| AI Tools | AI receptionist, chatbot, funnel builder | None yet (manual community management) |
| Automations | Multi-channel (SMS, email, chat, calls) | Zapier & webhooks only |
| White-Label SaaS | Yes | No |
| Best Fit | Agencies, SaaS founders, freelancers | Coaches, educators, community builders |
Our Favorite CRM: Try GoHighLevel Risk Free
HighLevel: The All-in-One Business Engine
HighLevel is built for agencies, SMBs, and SaaS founders who want to consolidate multiple tools into one platform.
-
Funnels & Websites – Drag-and-drop funnel builder with unlimited landing pages.
-
CRM & Pipelines – Track contacts, clients, and deal stages.
-
Automations – Visual workflow builder for multi-channel follow-ups.
-
AI Agents – AI receptionist for calls, chatbot for support, AI funnel generator.
-
Multi-Channel Comms – SMS, email, Messenger, Instagram DMs, voicemail drops.
-
Memberships & Courses – Create portals for digital products and training.
-
White-Label SaaS – Resell the platform under your own brand.
For vibe coders, HighLevel is like a SaaS starter kit: funnels + CRM + automation + resell potential.
Skool: The Community-First Platform
Skool is different: it’s not a CRM or funnel builder. Instead, it’s a community platform designed to replace Facebook Groups and LMS systems.
-
Community Hub – Posts, comments, and discussions (like a modern forum).
-
Courses – Simple course hosting inside the same platform.
-
Gamification – Points, levels, and leaderboards to drive engagement.
-
Calendar – Group events and calls.
-
Integrations – Zapier, webhooks, and Stripe for payments.
-
Flat Pricing – $99/mo per community, unlimited members.
For coders and educators, Skool is ideal for building an engaged audience around a niche project or course.
Pros & Cons
HighLevel Pros
-
Replaces multiple tools (funnels, email, SMS, CRM).
-
Unlimited users and contacts for flat pricing.
-
White-label SaaS mode (resell as your own platform).
-
AI-powered tools.
-
Multi-channel communication built-in.
HighLevel Cons
-
Overwhelming for beginners.
-
Limited community features compared to Skool.
-
Integrations gated to higher tiers.
Skool Pros
-
Extremely simple and user-friendly.
-
Combines community + courses in one place.
-
Gamification keeps members engaged.
-
Flat pricing (no member caps).
-
Great for audience building.
Skool Cons
-
No funnels, email, or SMS built-in.
-
Limited integrations (needs Zapier for most automations).
-
No white-label SaaS option.
-
Not a full CRM (member list only).
Use Cases for Vibe Coders
-
Freelancers & Agencies → HighLevel works better for managing leads, pipelines, and client comms. Skool is useful for running a paid community alongside client work.
-
SaaS Founders → HighLevel helps with GTM (funnels, onboarding, CRM). Skool works as a customer success or education hub.
-
Educators & Course Creators → Skool dominates with simple courses + community + gamification. HighLevel can host courses but lacks Skool’s community feel.
-
Coders Who Automate → HighLevel provides prebuilt automations. Skool requires Zapier or custom code.
-
Productizers → HighLevel’s white-label mode = resellable SaaS. Skool is closed-source, no reselling.
What Users Say
-
HighLevel: Agencies praise the all-in-one power, but some find the UI cluttered. Coders love the white-label potential.
-
Skool: Praised for simplicity and high engagement rates. Criticism: lack of advanced features like email, funnels, or analytics.
Our Favorite CRM: Try GoHighLevel Risk Free
FAQs
Which is more coder-friendly?
HighLevel for automation, APIs, and reselling. Skool if you want a no-code community hub.
Can I run a SaaS with these tools?
HighLevel: Yes, via white-label SaaS mode.
Skool: No, but you can build a community around your SaaS.
Which is better for education?
Skool, thanks to its course + gamification combo. HighLevel can host courses but isn’t community-driven.
Do they integrate well with dev stacks?
HighLevel: Limited, API only at higher plans.
Skool: Zapier and webhooks (lightweight but flexible).
Final Verdict
-
Choose HighLevel if you want a CRM + funnel + automation engine and potentially resell it as SaaS. Best for agencies, SaaS founders, and coders who need an all-in-one solution.
-
Choose Skool if you want a community + education hub to build an audience around coding, vibe projects, or SaaS. Best for coaches, educators, and community-driven builders.
Bottom line: HighLevel is the business engine, Skool is the community hub. Coders should use HighLevel when they need to capture and automate, and Skool when they need to engage and educate.
Want to see more comparisons? Check out our other posts on CRMs!
HighLevel vs ClickFunnels: All-in-One CRM or Funnel-Only Specialist?
Funnels are at the heart of modern digital marketing. Whether you’re freelancing, building a SaaS, or experimenting with vibe coding projects, you’ll need a system that not only attracts leads but also converts them into paying customers.
Two of the most popular options in this space are HighLevel (GoHighLevel) and ClickFunnels. Both promise powerful funnels, but they’re built for different kinds of users: one is a full CRM and automation platform, while the other is a funnel-focused specialist.
So, which one is better for coders and creators in 2025? Let’s break it down.
Quick Comparison Snapshot
| Feature | HighLevel | ClickFunnels |
|---|---|---|
| Core Focus | All-in-one CRM, funnels, automation, multi-channel marketing | Funnel & landing page builder |
| Pricing | $97–$497/mo (unlimited users) | $147–$297+/mo (per user) |
| CRM | Built-in pipelines & contact management | Very limited (not a true CRM) |
| AI Tools | AI receptionist, chatbot, funnel builder | Funnel AI (basic page suggestions, copy tweaks) |
| Automations | Multi-channel workflows (SMS, email, calls) | Email follow-ups (basic) |
| White-Label | Yes (SaaS resell option) | No |
| Best Fit | Agencies, SaaS founders, freelancers needing CRM + funnels | Marketers focused only on funnel design |
Our Favorite CRM: Try GoHighLevel Risk Free
HighLevel: The All-in-One CRM + Funnel Builder
HighLevel was designed to help agencies and service providers replace multiple tools at once.
-
Funnels & Websites – Drag-and-drop funnel builder with unlimited pages.
-
CRM & Pipelines – Track deals, contacts, and lead stages.
-
Multi-Channel Marketing – SMS, email, voicemail drops, chat, Messenger, Instagram.
-
Automations – Sophisticated workflows for follow-ups and nurture sequences.
-
AI Tools – Receptionist bot, chatbots, funnel-building assistant.
-
White-Label SaaS – Coders and agencies can rebrand and resell as their own SaaS platform.
-
Memberships & Courses – Built-in portals for digital products or communities.
For vibe coders, HighLevel is attractive because it covers everything in one dashboard — perfect for fast launches or turning client work into a SaaS business.
ClickFunnels: The Funnel Specialist
ClickFunnels is one of the most well-known names in the funnel-building world. Its sole mission: make it easy to build conversion-focused funnels.
-
Funnel Builder – Drag-and-drop page builder with templates for opt-ins, webinars, sales, upsells, and downsells.
-
Follow-Up Funnels – Email automation (requires higher tier).
-
Ecommerce Tools – Cart, checkout, and upsell pages.
-
Community & Training – Large knowledge base, Russell Brunson’s “Funnel Hacker” ecosystem.
-
Integrations – Connects with payment processors, autoresponders, and 3rd-party CRMs.
For coders, ClickFunnels is great if you just need a funnel tool and don’t want to spend time coding landing pages from scratch.
Pros & Cons
HighLevel Pros
-
Combines funnels, CRM, and automation.
-
Flat pricing (no per-user costs).
-
White-label SaaS mode (coders can resell).
-
AI-driven client tools.
-
Multi-channel (SMS, email, chat, calls).
HighLevel Cons
-
Steeper learning curve.
-
Limited integrations unless on higher plan.
-
All-in-one approach may feel overwhelming.
ClickFunnels Pros
-
Easiest funnel builder on the market.
-
Strong templates & funnel structures.
-
Excellent community and training.
-
Proven for conversion-focused landing pages.
ClickFunnels Cons
-
Expensive for funnel-only features.
-
Weak CRM (requires integrations for deal tracking).
-
Email automation locked to higher tier.
-
No white-label or reselling model.
Use Cases for Vibe Coders
-
Freelancers/Agencies → HighLevel is ideal if you want to manage funnels + CRM + client comms. ClickFunnels works if you just need funnels for clients.
-
SaaS Founders → HighLevel lets you build onboarding flows, nurture campaigns, and manage support in one system. ClickFunnels is better for quick launch funnels but not long-term customer management.
-
Coders Who Automate → HighLevel is better for workflows across SMS, email, and chat. ClickFunnels needs Zapier or APIs to extend functionality.
-
Productizers → HighLevel’s white-label SaaS mode = recurring revenue stream. ClickFunnels doesn’t have reselling potential.
What Users Say
-
HighLevel: Loved for replacing 5–6 tools, especially by agencies. Criticism: learning curve and limited integrations at lower tiers.
-
ClickFunnels: Praised for ease of use and templates. Criticism: pricey for funnel-only, limited CRM functionality.
Our Favorite CRM: Try GoHighLevel Risk Free
FAQs
Which is more coder-friendly?
HighLevel if you want to automate across multiple channels or resell as SaaS. ClickFunnels if you just want funnels without coding.
Which is better for AI?
HighLevel (AI receptionist, chatbot, funnel builder). ClickFunnels has some funnel AI but it’s basic.
Which is more affordable?
ClickFunnels looks cheaper but charges per user and limits features by plan. HighLevel has flat pricing with unlimited users.
Can I resell it as SaaS?
Only with HighLevel (white-label).
Final Verdict
-
Choose HighLevel if you want an all-in-one platform with CRM, automation, and funnels under one roof. Best for agencies, SaaS founders, and coders who want to build and resell systems.
-
Choose ClickFunnels if you want a simple, funnel-focused tool with great templates and don’t care about CRM or client management.
Bottom line: HighLevel is the all-in-one CRM + funnel engine, while ClickFunnels is the funnel-only specialist. Coders should decide based on whether they need a full system or just a funnel builder.
Want to see more comparisons? Check out our other posts on CRMs!
HighLevel vs WordPress CRM: All-in-One Growth Engine or DIY Developer Stack?
If you’re a coder, freelancer, or SaaS founder, you’ve probably faced this decision:
Should you build your own CRM stack on WordPress with plugins, or use an all-in-one platform like HighLevel (GoHighLevel)?
On the surface, both can handle lead capture, automation, and client management. But in reality, they’re very different: HighLevel is a prebuilt SaaS toolkit, while WordPress is a flexible, open-source sandbox where you build what you need from plugins and custom code.
Here’s a breakdown tailored for coders and builders.
Quick Comparison Snapshot
| Feature | HighLevel | WordPress (CRM Plugins) |
|---|---|---|
| Core Focus | Funnels, automation, all-in-one marketing & CRM | Flexible CMS + CRM plugins (Groundhogg, FluentCRM, WP ERP, Jetpack CRM) |
| Pricing | $97–$497/mo (flat, unlimited users) | Hosting (~$10–$30/mo) + premium plugins ($200–$600/yr typical) |
| AI Tools | AI receptionist, chatbot, funnel builder | Depends on plugins (few native AI features) |
| Integrations | Limited unless higher-tier | Virtually unlimited (Zapier, APIs, plugin ecosystem) |
| Best Fit | Agencies, freelancers, SaaS resellers | Coders who want to customize deeply and own their stack |
Our Favorite CRM: Try GoHighLevel Risk Free
HighLevel: The Prebuilt Growth Engine
HighLevel is built to replace multiple tools at once. Instead of piecing together email, SMS, funnels, and booking plugins, you get it in one dashboard.
-
Funnels & Websites – Drag-and-drop funnel builder.
-
CRM & Pipelines – Deal tracking, lead management.
-
Multi-Channel Comms – SMS, email, Messenger, Instagram, voicemail drops.
-
Automations – Visual workflow builder.
-
AI Agents – Receptionist bot, chatbots, funnel-building AI.
-
White-Label SaaS – Resell HighLevel under your own brand.
For coders, HighLevel is attractive when you want to move fast without managing infrastructure.
WordPress: The DIY Developer Stack
WordPress isn’t a CRM out of the box — but with the right plugins, it can become one.
-
CRM Plugins – Groundhogg, FluentCRM, WP ERP, Jetpack CRM.
-
Email Marketing – Plugins like FluentCRM or MailPoet integrate directly.
-
Form Builders – Gravity Forms, WPForms, Fluent Forms for lead capture.
-
Automation – Uncanny Automator, AutomatorWP, or custom scripts.
-
Memberships/Courses – LearnDash, LifterLMS, MemberPress.
-
Custom Coding – Total freedom with PHP, REST API, or custom plugins.
For vibe coders, WordPress is a playground: you can build exactly what you need — but you’ll also need to maintain it.
Pros & Cons
HighLevel Pros
-
Out-of-the-box funnels, CRM, and automation.
-
Flat-rate pricing (no per-user charges).
-
White-label SaaS mode for reselling.
-
AI-driven client tools.
-
No plugin compatibility headaches.
HighLevel Cons
-
Limited integrations unless on higher tiers.
-
Less customizable than WordPress.
-
Generalist features may not go as deep as specialized tools.
WordPress Pros
-
Extreme flexibility (own and control your stack).
-
Huge plugin ecosystem (tens of thousands).
-
Lower base costs (especially for solo coders).
-
Full control over data (self-hosted).
-
Ideal for coders who love to tinker.
WordPress Cons
-
Plugins can conflict, break, or slow your site.
-
Requires maintenance, backups, and security hardening.
-
No white-label SaaS resell option out-of-the-box.
-
AI features are limited unless using 3rd-party tools.
Use Cases for Vibe Coders
-
Freelancers/Agencies → HighLevel makes sense for client onboarding, follow-ups, and reselling as SaaS. WordPress works if you want total control and low cost.
-
SaaS Founders → HighLevel gets you funnels and CRM fast; WordPress lets you build fully custom client portals with plugins.
-
Coders Who Automate → HighLevel = no-code automations out of the box. WordPress = infinite flexibility with APIs, Zapier, and PHP.
-
Productizers → HighLevel’s white-label mode gives you a SaaS in a box. WordPress requires building your own product stack.
What Users Say
-
HighLevel: Loved by agencies for replacing 6+ tools, but some find the interface overwhelming.
-
WordPress: Coders love the freedom but warn about plugin bloat and maintenance headaches.
Our Favorite CRM: Try GoHighLevel Risk Free
FAQs
Which is more coder-friendly?
WordPress — you can customize everything with code. HighLevel is better if you’d rather skip coding and ship.
Which is better for AI?
HighLevel has built-in AI tools. WordPress relies on third-party integrations.
Which is cheaper?
WordPress is cheaper at first but can get costly with premium plugins and dev time. HighLevel is more predictable with flat pricing.
Can I resell as SaaS?
HighLevel yes (white-label). WordPress requires heavy customization to turn into a SaaS.
Final Verdict
-
Choose HighLevel if you want a done-for-you growth platform with funnels, CRM, and automation baked in. Great for agencies, freelancers, and coders who want to resell SaaS.
-
Choose WordPress if you want a flexible DIY stack where you can code and customize everything — and you don’t mind maintaining it.
Bottom line: HighLevel is the growth engine, WordPress is the sandbox. Coders should choose based on whether they prefer to build or buy.
Want to see more comparisons? Check out our other posts on CRMs!
HighLevel vs Zoho for Coders: All-in-One Funnel Builder or Modular CRM Toolbox?
When you’re coding your own projects, freelancing, or building a SaaS, your CRM choice can define how smooth your client acquisition and retention flows are. Two popular options that often come up are HighLevel (GoHighLevel) and Zoho CRM.
Both are powerful, but they take different approaches: HighLevel is an all-in-one automation and funnel platform, while Zoho is a modular CRM suite that integrates into a massive business ecosystem.
Here’s the breakdown.
Quick Comparison Snapshot
| Feature | HighLevel | Zoho CRM |
|---|---|---|
| Core Focus | Funnels, automation, multi-channel marketing | Modular CRM for sales, marketing, and support |
| Pricing | $97–$497/mo flat (unlimited users) | From $14/user/mo to $52/user/mo (Enterprise) |
| AI Tools | AI receptionist, chatbot, funnel builder | Zia AI: sales predictions, workflow suggestions, sentiment analysis |
| Integrations | Limited unless on higher tiers | Massive integrations (40+ Zoho apps, 1,000+ third-party) |
| Best Fit | Agencies, freelancers, SaaS resellers | SMBs and enterprises needing modular scalability |
Our Favorite CRM: Try GoHighLevel Risk Free
HighLevel: The All-in-One Funnel Builder
HighLevel is built for marketers and agencies, but coders and SaaS founders can benefit too.
-
Funnels & Websites – Drag-and-drop builder for sales funnels and landing pages.
-
Multi-Channel Comms – Email, SMS, Messenger, Instagram, voicemail drops, live chat.
-
Automations – Advanced workflows to nurture leads and clients.
-
AI Agents – Virtual receptionist, AI chat, AI funnel building.
-
White-Label SaaS Mode – Coders and agencies can rebrand and resell as their own platform.
-
Memberships – Online courses, gated portals.
For vibe coders, HighLevel means fewer integrations, more automation out of the box.
Zoho: The Modular CRM Toolbox
Zoho takes a different route: instead of being all-in-one from the start, it’s modular. You start with Zoho CRM, then add apps as needed.
-
Zoho CRM Core – Lead and deal management, pipelines, reporting.
-
Zia AI – Predicts win probability, suggests workflows, analyzes sentiment.
-
Zoho One Suite – 40+ apps: books, email, helpdesk, projects, inventory, HR, and more.
-
Customization – Blueprints, workflow automations, low-code tools (Zoho Creator).
-
Integrations – 1,000+ apps via Zoho Marketplace and APIs.
For coders, Zoho appeals if you like picking the exact modules you need and scaling over time.
Pros & Cons
HighLevel Pros
-
Combines funnels, comms, and CRM in one.
-
Flat-rate pricing (no per-user costs).
-
White-label SaaS mode = unique revenue stream for coders.
-
Strong multi-channel automation.
-
Practical AI agents.
HighLevel Cons
-
Limited integrations unless you’re on $497/mo plan.
-
Generalist platform (not as deep in reporting or analytics).
-
Steeper learning curve for beginners.
Zoho Pros
-
Affordable entry-level pricing.
-
Extremely modular and scalable.
-
Strong AI features (Zia is highly rated).
-
Huge ecosystem (Zoho One can replace dozens of apps).
-
Open API and low-code customization (Zoho Creator).
Zoho Cons
-
Pricing is per user, can get costly with teams.
-
Overwhelming app ecosystem — may feel fragmented.
-
Some apps less polished than competitors.
-
Can require setup time and tinkering.
Use Cases for Vibe Coders
-
Freelancers/Agencies → HighLevel helps with funnels, SMS, and quick client follow-up. Zoho requires more setup but offers modular power.
-
SaaS Founders → HighLevel works for fast GTM with funnels and onboarding flows. Zoho is better for scaling with back-office apps like finance, HR, or support.
-
Coders Who Automate → HighLevel is great for no-code automation. Zoho appeals to devs who want APIs and low-code customization.
-
Productizers → HighLevel is unique with white-label SaaS reselling. Zoho doesn’t offer that.
What Users Say
-
HighLevel: Users love consolidating multiple tools but note integrations are limited. Agencies rave about white-label.
-
Zoho: Praised for affordability and breadth of apps. Some say it’s “the best value CRM,” others complain about UI complexity.
Our Favorite CRM: Try GoHighLevel Risk Free
FAQs
Which is more coder-friendly?
Zoho — with APIs, low-code tools, and modular apps. HighLevel is more turnkey.
Which AI is stronger?
Zoho’s Zia offers analytics and predictions. HighLevel’s AI is more practical for SMBs (chatbots, receptionists).
Can I resell either platform?
Yes with HighLevel (white-label). Zoho doesn’t offer SaaS reselling.
Which is better for scaling a SaaS?
HighLevel is good for fast go-to-market. Zoho is better for operational scaling (finance, support, HR, CRM in one ecosystem).
Final Verdict
-
Choose HighLevel if you want a fast, all-in-one funnel builder and client comms hub, or if you’re a coder/agency looking to resell SaaS under your own brand.
-
Choose Zoho if you want a flexible, modular CRM toolbox that grows with your company and plugs into nearly any workflow.
Bottom line: HighLevel is the funnel builder, Zoho is the toolbox. Coders should choose based on whether they want speed and simplicity (HighLevel) or modular control and long-term scalability (Zoho).
Want to see more comparisons? Check out our other posts on CRMs!